一、 引入:SDN的革命性价值
“SDN将网络控制平面与数据平面分离,带来:
- 聚焦控制:全网策略统一管理
- 自动化运维:API驱动网络配置
- 灵活编程:自定义网络行为
- 创新加速:新功能快速上线
Gartner预测:到2025年,70%的企业网络将采用SDN技术!”
二、 SDN架构核心三要素
1. SDN架构模型

2. 传统网络 vs SDN网络
# 架构对比分析
| **特性** | **传统网络** | **SDN网络** |
| :--- | :--- | :--- |
| **控制方式** | 分布式,每设备独立决策 | 聚焦式,控制器统一决策 |
| **管理接口** | CLI/SNMP,设备级管理 | API/REST,网络级管理 |
| **配置速度** | 手动,慢,易出错 | 自动,快,一致性高 |
| **创新周期** | 长(依赖设备厂商) | 短(软件定义功能) |
| **运维成本** | 高(需要专业工程师) | 低(自动化工具) |
三、 SDN控制器深度解析
1. 主流SDN控制器对比
# 控制器特性矩阵
| **控制器** | **厂商** | **架构** | **特点** | **适用场景** |
| :--- | :--- | :--- | :--- | :--- |
| **OpenDaylight** | Linux基金会 | 模块化,Java | 功能丰富,社区活跃 | 企业级,多云 |
| **ONOS** | ONF组织 | 分布式,Java | 运营商级,高可用 | 电信网络,大规模 |
| **Floodlight** | 开源社区 | 轻量级,Java | 简单易用,学习友善 | 实验环境,中小网络 |
| **RYU** | 开源社区 | Python框架 | 开发灵活,Python生态 | 研发测试,定制开发 |
| **Cisco ACI** | Cisco | 硬件集成,策略驱动 | 数据中心SDN解决方案 | Cisco环境,企业DC |
| **NSX** | VMware | 虚拟化集成,Overlay | 虚拟网络,云原生 | 虚拟化环境,多云 |
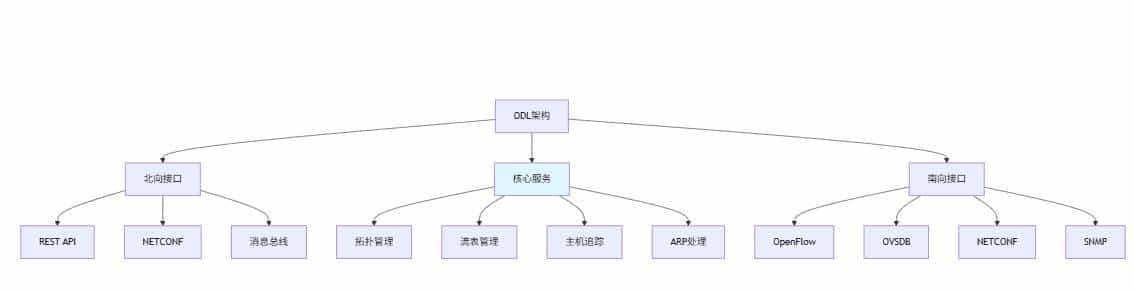
2. OpenDaylight控制器架构
3. ODL基础部署与配置
# OpenDaylight Docker部署
docker run -dit --name odl
  -p 8080:8080 -p 6633:6633 -p 6640:6640
  -e ODL_USER=admin -e ODL_PASSWORD=admin
  opendaylight/odl:latest

# 访问Web界面
# http://localhost:8080 (admin/admin)

# Karaf控制台操作
ssh -p 8101 admin@localhost
# 安装常用功能包
feature:install odl-restconf odl-l2switch-switch odl-mdsal-apidocs
4. Python ODL控制器编程
import requests
import json

class ODLClient:
    """OpenDaylight REST API客户端"""

    def __init__(self, host='localhost', port='8181',
                 username='admin', password='admin'):
        self.base_url = f"http://{host}:{port}/restconf"
        self.auth = (username, password)
        self.headers = {
            'Content-Type': 'application/json',
            'Accept': 'application/json'
        }

    def get_topology(self):
        """获取网络拓扑"""
        url = f"{self.base_url}/operational/network-topology:network-topology"

        response = requests.get(url, auth=self.auth, headers=self.headers)
        if response.status_code == 200:
            return response.json()
        else:
            print(f"获取拓扑失败: {response.status_code}")
            return None

    def get_nodes(self):
        """获取所有节点"""
        url = f"{self.base_url}/operational/opendaylight-inventory:nodes"

        response = requests.get(url, auth=self.auth, headers=self.headers)
        if response.status_code == 200:
            return response.json()
        else:
            print(f"获取节点失败: {response.status_code}")
            return None

    def install_flow(self, node_id, flow_config):
        """安装流表项"""
        url = f"{self.base_url}/config/opendaylight-inventory:nodes/node/{node_id}/flow-node-inventory:table/0"

        response = requests.post(
            url,
            auth=self.auth,
            headers=self.headers,
            data=json.dumps(flow_config)
        )

        if response.status_code in [200, 201, 204]:
            print(f"流表安装成功: {node_id}")
            return True
        else:
            print(f"流表安装失败: {response.status_code} - {response.text}")
            return False

    def get_flows(self, node_id):
        """获取节点的流表"""
        url = f"{self.base_url}/operational/opendaylight-inventory:nodes/node/{node_id}/flow-node-inventory:table/0"

        response = requests.get(url, auth=self.auth, headers=self.headers)
        if response.status_code == 200:
            return response.json()
        else:
            print(f"获取流表失败: {response.status_code}")
            return None

# 使用示例
def odl_demo():
    client = ODLClient()

    # 获取拓扑信息
    topology = client.get_topology()
    if topology:
        print("网络拓扑:")
        print(json.dumps(topology, indent=2))

    # 创建流表配置
    flow_config = {
        "flow-node-inventory:flow": [
            {
                "id": "block-icmp",
                "priority": 1000,
                "match": {
                    "ethernet-type": {"type": 0x0800},
                    "ip-protocol": 1  # ICMP
                },
                "instructions": {
                    "instruction": [
                        {
                            "order": 0,
                            "apply-actions": {
                                "action": [
                                    {
                                        "order": 0,
                                        "drop-action": {}
                                    }
                                ]
                            }
                        }
                    ]
                }
            }
        ]
    }

    # 安装流表(需要先有OpenFlow交换机连接)
    nodes = client.get_nodes()
    if nodes and 'node' in nodes.get('nodes', {}):
        for node in nodes['nodes']['node']:
            if node['id'].startswith('openflow:'):
                client.install_flow(node['id'], flow_config)

odl_demo()
四、 南向接口协议详解
1. 南向接口协议对比
# 南向接口协议矩阵
| **协议** | **标准组织** | **传输方式** | **特点** | **应用场景** |
| :--- | :--- | :--- | :--- | :--- |
| **OpenFlow** | ONF | TCP/TLS | 流表控制,精细管控 | 数据中心,校园网 |
| **OVSDB** | IETF | TCP/SSL | OVS数据库管理 | 虚拟化,云平台 |
| **NETCONF** | IETF | SSH/TLS | 配置管理,YANG模型 | 网络设备配置 |
| **P4** | P4.org | 无标准 | 可编程数据平面 | 定制转发,科研 |
| **BGP-LS** | IETF | TCP | 拓扑收集,路由控制 | 运营商网络 |
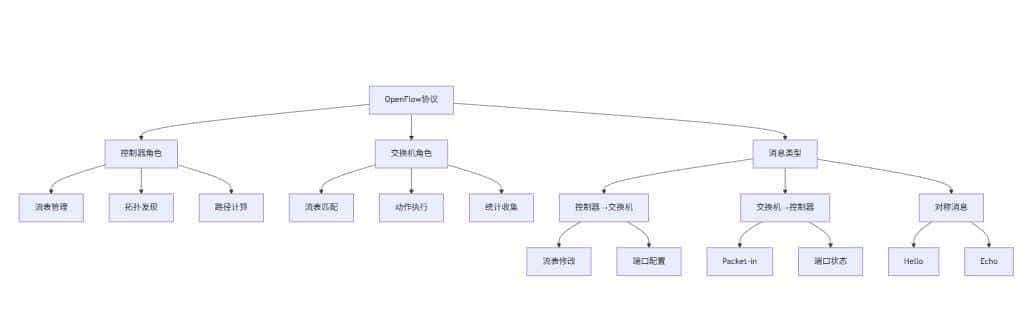
2. OpenFlow协议深度解析
3. OpenFlow流表结构
# OpenFlow流表项数据结构
flow_entry = {
    "match": {
        "in_port": 1,
        "eth_dst": "00:11:22:33:44:55",
        "eth_src": "aa:bb:cc:dd:ee:ff",
        "eth_type": 0x0800,  # IPv4
        "ipv4_src": "192.168.1.0/24",
        "ipv4_dst": "10.0.0.1",
        "ip_proto": 6,  # TCP
        "tcp_dst": 80
    },
    "priority": 1000,
    "idle_timeout": 300,
    "hard_timeout": 3600,
    "instructions": {
        "apply_actions": [
            {"type": "OUTPUT", "port": 2},
            {"type": "SET_FIELD", "field": "ip_dscp", "value": 46}
        ],
        "write_actions": [
            {"type": "SET_FIELD", "field": "vlan_vid", "value": 100}
        ],
        "goto_table": 1
    },
    "counters": {
        "packet_count": 0,
        "byte_count": 0
    }
}
4. OVSDB协议实战
import ovs.db.types
from ovsdb-client import OVSDBClient

class OVSDBManager:
    """OVSDB管理客户端"""

    def __init__(self, host='localhost', port=6640):
        self.client = OVSDBClient(host, port)

    def create_bridge(self, bridge_name):
        """创建虚拟网桥"""
        transaction = {
            "id": "create_bridge",
            "method": "transact",
            "params": [
                "Open_vSwitch",
                {
                    "op": "insert",
                    "table": "Bridge",
                    "row": {
                        "name": bridge_name,
                        "datapath_type": "netdev"
                    }
                }
            ]
        }

        return self.client.send(transaction)

    def add_port_to_bridge(self, bridge_name, port_name):
        """添加端口到网桥"""
        transaction = {
            "id": "add_port",
            "method": "transact",
            "params": [
                "Open_vSwitch",
                {
                    "op": "insert",
                    "table": "Port",
                    "row": {
                        "name": port_name,
                        "interfaces": ["set", [["uuid", self._create_interface(port_name)]]]
                    }
                },
                {
                    "op": "mutate",
                    "table": "Bridge",
                    "where": [["name", "==", bridge_name]],
                    "mutations": [["ports", "insert", ["set", [["uuid", "##PORT_UUID##"]]]]]
                }
            ]
        }

        return self.client.send(transaction)

    def create_vxlan_port(self, port_name, remote_ip, key=1000):
        """创建VXLAN隧道端口"""
        interface_config = {
            "type": "vxlan",
            "options": {
                "remote_ip": remote_ip,
                "key": str(key)
            }
        }

        transaction = {
            "id": "create_vxlan",
            "method": "transact",
            "params": [
                "Open_vSwitch",
                {
                    "op": "insert",
                    "table": "Interface",
                    "row": {
                        "name": port_name,
                        "type": "vxlan",
                        "options": [["map", interface_config["options"]]]
                    }
                }
            ]
        }

        return self.client.send(transaction)

# 使用示例
def ovsdb_demo():
    manager = OVSDBManager('192.168.1.100')

    # 创建网桥
    result = manager.create_bridge('br-sdn')
    print("创建网桥结果:", result)

    # 添加VXLAN端口
    result = manager.create_vxlan_port('vxlan-tunnel', '192.168.2.100')
    print("创建VXLAN结果:", result)

ovsdb_demo()
五、 Overlay网络技术实战
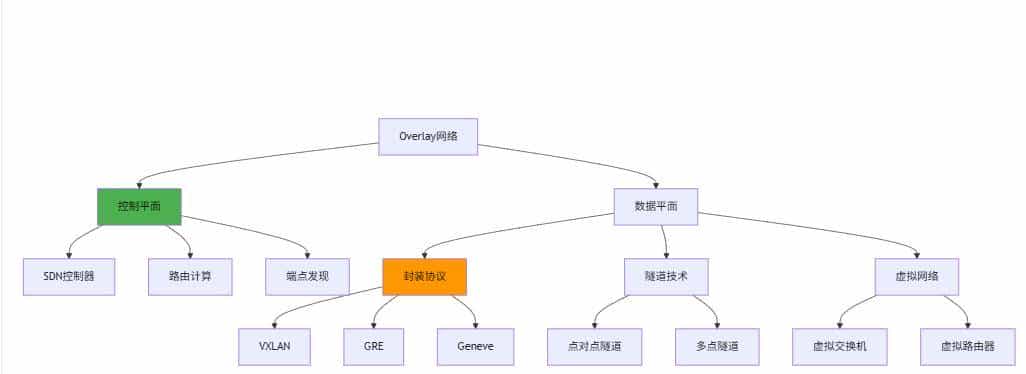
1. Overlay网络架构
2. VXLAN Overlay部署实战
import subprocess
import json

class VXLANOverlay:
    """VXLAN Overlay网络管理"""

    def __init__(self, bridge_name='br-overlay'):
        self.bridge_name = bridge_name

    def create_vxlan_infrastructure(self):
        """创建VXLAN基础设施"""
        commands = [
            # 创建虚拟网桥
            f"ovs-vsctl add-br {self.bridge_name}",
            # 设置网桥控制器
            f"ovs-vsctl set-controller {self.bridge_name} tcp:192.168.1.10:6633",
            # 启用STP(可选)
            f"ovs-vsctl set bridge {self.bridge_name} stp_enable=true"
        ]

        for cmd in commands:
            try:
                subprocess.run(cmd, shell=True, check=True)
                print(f"执行成功: {cmd}")
            except subprocess.CalledProcessError as e:
                print(f"执行失败: {cmd} - {e}")

    def add_vxlan_tunnel(self, tunnel_name, remote_ip, vni=10000):
        """添加VXLAN隧道"""
        cmd = (
            f"ovs-vsctl add-port {self.bridge_name} {tunnel_name} "
            f"-- set interface {tunnel_name} type=vxlan "
            f"options:remote_ip={remote_ip} options:key={vni}"
        )

        try:
            subprocess.run(cmd, shell=True, check=True)
            print(f"VXLAN隧道创建成功: {tunnel_name} -> {remote_ip}")
            return True
        except subprocess.CalledProcessError as e:
            print(f"隧道创建失败: {e}")
            return False

    def create_virtual_network(self, vni, gateway_ip, subnet='24'):
        """创建虚拟网络"""
        # 创建网络命名空间(模拟虚拟机)
        ns_name = f"vn-{vni}"
        commands = [
            f"ip netns add {ns_name}",
            f"ovs-vsctl add-port {self.bridge_name} veth-{vni}",
            f"ip link add veth-{vni}-a type veth peer name veth-{vni}-b",
            f"ip link set veth-{vni}-a up",
            f"ip link set veth-{vni}-b netns {ns_name}",
            f"ip netns exec {ns_name} ip link set veth-{vni}-b up",
            f"ip netns exec {ns_name} ip addr add {gateway_ip}/{subnet} dev veth-{vni}-b"
        ]

        for cmd in commands:
            try:
                subprocess.run(cmd, shell=True, check=True)
            except subprocess.CalledProcessError as e:
                print(f"命令执行失败: {cmd} - {e}")
                return False

        print(f"虚拟网络创建成功: VNI={vni}, Gateway={gateway_ip}")
        return True

    def configure_flow_for_vni(self, vni, segmentation=True):
        """为VNI配置流表规则"""
        if segmentation:
            # 配置流量隔离规则
            flow_rules = [
                # 允许同一VNI内通信
                f"ovs-ofctl add-flow {self.bridge_name} table=0,priority=1000,tun_id={vni},actions=normal",
                # 阻止不同VNI间通信
                f"ovs-ofctl add-flow {self.bridge_name} table=0,priority=900,tun_id=!{vni},actions=drop"
            ]
        else:
            # 允许跨VNI通信
            flow_rules = [
                f"ovs-ofctl add-flow {self.bridge_name} table=0,priority=1000,actions=normal"
            ]

        for rule in flow_rules:
            try:
                subprocess.run(rule, shell=True, check=True)
                print(f"流表规则添加成功: {rule}")
            except subprocess.CalledProcessError as e:
                print(f"流表规则添加失败: {rule} - {e}")

# 使用示例
def vxlan_overlay_demo():
    overlay = VXLANOverlay('br-sdn-overlay')

    # 创建基础设施
    overlay.create_vxlan_infrastructure()

    # 添加隧道连接到其他节点
    overlay.add_vxlan_tunnel('vxlan-to-node2', '192.168.1.101', vni=10000)
    overlay.add_vxlan_tunnel('vxlan-to-node3', '192.168.1.102', vni=10000)

    # 创建多个虚拟网络
    overlay.create_virtual_network(100, '10.100.1.1')
    overlay.create_virtual_network(200, '10.100.2.1')

    # 配置流表规则
    overlay.configure_flow_for_vni(100, segmentation=True)
    overlay.configure_flow_for_vni(200, segmentation=True)

vxlan_overlay_demo()
3. Geneve协议高级特性
class GeneveOverlay:
    """Geneve Overlay网络管理"""

    def create_geneve_tunnel(self, tunnel_name, remote_ip, options=None):
        """创建Geneve隧道"""
        base_cmd = f"ovs-vsctl add-port br-geneve {tunnel_name} -- set interface {tunnel_name} type=geneve options:remote_ip={remote_ip}"

        if options:
            option_str = " ".join([f"options:{k}={v}" for k, v in options.items()])
            base_cmd += f" {option_str}"

        try:
            subprocess.run(base_cmd, shell=True, check=True)
            print(f"Geneve隧道创建成功: {tunnel_name}")
            return True
        except subprocess.CalledProcessError as e:
            print(f"Geneve隧道创建失败: {e}")
            return False

    def set_geneve_options(self, tunnel_name, **options):
        """设置Geneve选项"""
        option_cmds = []
        for key, value in options.items():
            cmd = f"ovs-vsctl set interface {tunnel_name} options:{key}={value}"
            option_cmds.append(cmd)

        for cmd in option_cmds:
            try:
                subprocess.run(cmd, shell=True, check=True)
            except subprocess.CalledProcessError as e:
                print(f"设置选项失败: {cmd} - {e}")

# Geneve高级选项示例
geneve_options = {
    "csum": "true",           # 校验和
    "key": "flow",            # 流表键值
    "tos": "inherit",         # 继承ToS
    "ttl": "64",              # TTL值
    "dscp": "46"              # DSCP标记
}
六、 SDN应用场景实战
1. 负载均衡应用
class SDNLoadBalancer:
    """SDN负载均衡器"""

    def __init__(self, odl_client):
        self.odl_client = odl_client
        self.server_pools = {}
        self.flow_tables = {}

    def create_server_pool(self, pool_name, servers):
        """创建服务器池"""
        self.server_pools[pool_name] = {
            'servers': servers,
            'current_index': 0,
            'health_status': {server: True for server in servers}
        }

        print(f"服务器池创建成功: {pool_name} -> {servers}")

    def install_load_balance_flows(self, node_id, vip, pool_name):
        """安装负载均衡流表"""
        servers = self.server_pools[pool_name]['servers']

        # 基于IP哈希的负载均衡
        for i, server in enumerate(servers):
            flow_config = {
                "flow-node-inventory:flow": [
                    {
                        "id": f"lb-{pool_name}-{i}",
                        "priority": 1000,
                        "match": {
                            "ipv4-destination": vip,
                            "ipv4-source": f"10.0.0.0/16"  # 客户端网段
                        },
                        "instructions": {
                            "instruction": [
                                {
                                    "order": 0,
                                    "apply-actions": {
                                        "action": [
                                            {
                                                "order": 0,
                                                "set-field": {
                                                    "ipv4-destination": server
                                                }
                                            },
                                            {
                                                "order": 1,
                                                "output-action": {
                                                    "output-node-connector": "NORMAL"
                                                }
                                            }
                                        ]
                                    }
                                }
                            ]
                        }
                    }
                ]
            }

            self.odl_client.install_flow(node_id, flow_config)
            self.flow_tables[f"{node_id}-{pool_name}"] = flow_config

        print(f"负载均衡流表安装完成: VIP={vip}, 后端={servers}")

    def health_check(self, pool_name):
        """健康检查"""
        import requests
        import threading

        def check_server(server):
            try:
                response = requests.get(f"http://{server}:80/health", timeout=5)
                self.server_pools[pool_name]['health_status'][server] = (
                    response.status_code == 200
                )
            except:
                self.server_pools[pool_name]['health_status'][server] = False

        threads = []
        for server in self.server_pools[pool_name]['servers']:
            thread = threading.Thread(target=check_server, args=(server,))
            thread.start()
            threads.append(thread)

        for thread in threads:
            thread.join()

        print(f"健康检查完成: {pool_name}")
        print("服务器状态:", self.server_pools[pool_name]['health_status'])

# 使用示例
def load_balancer_demo():
    odl_client = ODLClient()
    lb = SDNLoadBalancer(odl_client)

    # 创建服务器池
    lb.create_server_pool('web-servers', ['192.168.10.101', '192.168.10.102', '192.168.10.103'])

    # 安装负载均衡规则
    nodes = odl_client.get_nodes()
    if nodes:
        for node in nodes.get('nodes', {}).get('node', []):
            if node['id'].startswith('openflow:'):
                lb.install_load_balance_flows(node['id'], '192.168.100.100', 'web-servers')

    # 执行健康检查
    lb.health_check('web-servers')

load_balancer_demo()
2. 网络安全策略应用
class SDNFirewall:
    """SDN防火墙"""

    def __init__(self, odl_client):
        self.odl_client = odl_client
        self.security_groups = {}

    def create_security_group(self, sg_name, rules):
        """创建安全组"""
        self.security_groups[sg_name] = {
            'rules': rules,
            'members': []
        }

        print(f"安全组创建成功: {sg_name}")

    def apply_security_group(self, node_id, port_id, sg_name):
        """应用安全组到端口"""
        rules = self.security_groups[sg_name]['rules']

        for i, rule in enumerate(rules):
            flow_config = {
                "flow-node-inventory:flow": [
                    {
                        "id": f"sg-{sg_name}-{port_id}-{i}",
                        "priority": rule['priority'],
                        "match": self._build_match(rule, port_id),
                        "instructions": {
                            "instruction": [
                                {
                                    "order": 0,
                                    "apply-actions": {
                                        "action": [
                                            {
                                                "order": 0,
                                                "output-action": {
                                                    "output-node-connector": "NORMAL"
                                                }
                                            } if rule['action'] == 'allow' else {
                                                "order": 0,
                                                "drop-action": {}
                                            }
                                        ]
                                    }
                                }
                            ]
                        }
                    }
                ]
            }

            self.odl_client.install_flow(node_id, flow_config)

        print(f"安全组应用成功: {sg_name} -> 端口{port_id}")

    def _build_match(self, rule, port_id):
        """构建流表匹配条件"""
        match = {}

        if 'in_port' in rule:
            match['in-port'] = port_id

        if 'protocol' in rule:
            if rule['protocol'] == 'tcp':
                match['ip-protocol'] = 6
            elif rule['protocol'] == 'udp':
                match['ip-protocol'] = 17
            elif rule['protocol'] == 'icmp':
                match['ip-protocol'] = 1

        if 'source_ip' in rule:
            match['ipv4-source'] = rule['source_ip']

        if 'dest_ip' in rule:
            match['ipv4-destination'] = rule['dest_ip']

        if 'source_port' in rule:
            match[f"{rule['protocol']}-source-port"] = rule['source_port']

        if 'dest_port' in rule:
            match[f"{rule['protocol']}-destination-port"] = rule['dest_port']

        return match

# 使用示例
def firewall_demo():
    odl_client = ODLClient()
    firewall = SDNFirewall(odl_client)

    # 定义安全组规则
    web_sg_rules = [
        {'priority': 1000, 'protocol': 'tcp', 'dest_port': 80, 'action': 'allow'},
        {'priority': 1000, 'protocol': 'tcp', 'dest_port': 443, 'action': 'allow'},
        {'priority': 900, 'protocol': 'tcp', 'dest_port': 22, 'action': 'allow'},
        {'priority': 100, 'action': 'deny'}  # 默认拒绝
    ]

    firewall.create_security_group('web-server-sg', web_sg_rules)

    # 应用安全组
    nodes = odl_client.get_nodes()
    if nodes:
        for node in nodes.get('nodes', {}).get('node', []):
            firewall.apply_security_group(node['id'], '1', 'web-server-sg')

firewall_demo()
七、 生产环境部署考量
1. 高可用性设计
# OpenDaylight集群配置
odl_cluster:
  nodes:
    - id: "odl-node-1"
      ip: "192.168.1.10"
      role: "leader"
    - id: "odl-node-2"
      ip: "192.168.1.11"
      role: "follower"
    - id: "odl-node-3"
      ip: "192.168.1.12"
      role: "follower"

  # 数据存储配置
  datastore:
    type: "h2"  # 或 "cassandra" 用于生产环境
    backup_enabled: true

  # 故障转移配置
  failover:
    timeout: "30s"
    heartbeat_interval: "5s"
2. 性能优化策略
class SDNOptimizer:
    """SDN性能优化器"""

    def optimize_flow_table(self, node_id, optimization_strategy='aggregation'):
        """优化流表性能"""

        if optimization_strategy == 'aggregation':
            # 流表聚合策略
            self._aggregate_flows(node_id)
        elif optimization_strategy == 'timeout':
            # 超时优化策略
            self._optimize_timeouts(node_id)
        elif optimization_strategy == 'cache':
            # 缓存优化策略
            self._implement_caching(node_id)

    def _aggregate_flows(self, node_id):
        """流表聚合"""
        # 获取当前流表
        flows = self.odl_client.get_flows(node_id)

        # 识别可以聚合的流表项
        aggregated_flows = self._identify_aggregation_candidates(flows)

        # 安装聚合后的流表
        for flow_group in aggregated_flows:
            self.odl_client.install_flow(node_id, flow_group)

    def monitor_performance(self):
        """性能监控"""
        import psutil
        import time

        while True:
            # 监控控制器性能
            cpu_usage = psutil.cpu_percent(interval=1)
            memory_usage = psutil.virtual_memory().percent

            # 监控流表数量
            flow_stats = self._get_flow_table_stats()

            print(f"CPU使用率: {cpu_usage}%")
            print(f"内存使用率: {memory_usage}%")
            print(f"流表统计: {flow_stats}")

            # 性能告警
            if cpu_usage > 80:
                self._trigger_optimization()

            time.sleep(60)  # 每分钟检查一次
八、 未来趋势:P4可编程数据平面
1. P4基础概念
// P4程序示例:简单路由器
#include <core.p4>
#include <v1model.p4>

struct metadata {
    bit<32> ingress_port;
    bit<32> egress_port;
}

parser MyParser(packet_in packet, out headers hdr, inout metadata meta) {
    state start {
        packet.extract(hdr.ethernet);
        transition select(hdr.ethernet.etherType) {
            0x0800: parse_ipv4;
            default: accept;
        }
    }

    state parse_ipv4 {
        packet.extract(hdr.ipv4);
        transition accept;
    }
}

control MyIngress(inout headers hdr, inout metadata meta) {
    action drop() {
        mark_to_drop();
    }

    action forward(bit<9> port) {
        meta.egress_port = port;
    }

    table ipv4_lpm {
        key = {
            hdr.ipv4.dstAddr: lpm;
        }
        actions = {
            forward;
            drop;
        }
        size = 1024;
        default_action = drop;
    }

    apply {
        ipv4_lpm.apply();
    }
}
九、 总结:SDN部署最佳实践
部署检查清单:
- ✅ 控制器选型是否匹配业务需求?
- ✅ 南向接口协议是否兼容现有设备?
- ✅ Overlay网络设计是否满足扩展性?
- ✅ 高可用性方案是否经过测试?
- ✅ 安全策略是否完善?
- ✅ 性能监控体系是否建立?
- ✅ 运维团队技能是否到位?
- ✅ 回滚方案是否准备充分?
成功关键因素:
- 渐进式部署:从非关键业务开始试点
- 标准化接口:坚持使用开放标准
- 自动化运维:建立完整的自动化流程
- 团队培训:培养SDN运维技能
- 生态整合:与云平台、编排系统集成
互动提问:
- 你在SDN部署中遇到的最大挑战是什么?
- 有什么独特的SDN应用场景或优化经验?
- 对SDN技术的未来发展有什么见解?
© 版权声明
文章版权归作者所有,未经允许请勿转载。
相关文章


暂无评论...