在当今的网络架构中,Nginx作为一款高性能的HTTP和反向代理服务器,被广泛应用于各种规模的企业中。本文将详细介绍Nginx的反向代理功能、配置方法及其应用场景。
Nginx反向代理
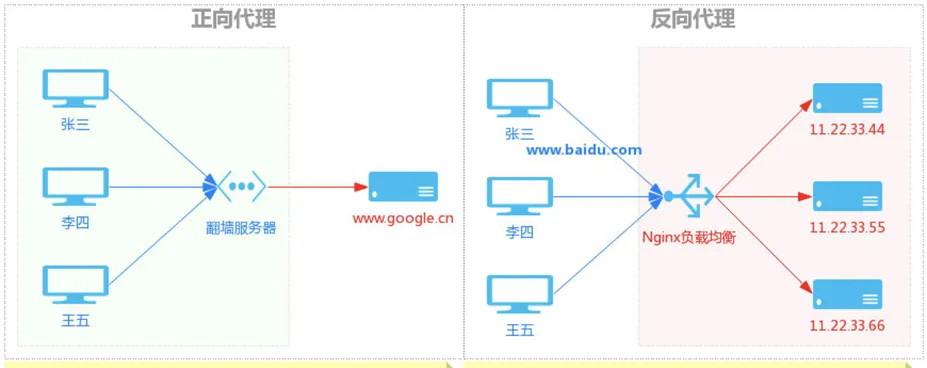
代理Proxy有两种
正向代理: 代理客户端访问服务器,可以实现缓存,科学上网,访问控制等功能。
反向代理:reverse proxy,指的是代理外网用户的请求到内部的指定的服务器,并将数据返回给用户的一种方式,这是用的比较多的一种方式。
Nginx 除了可以在企业提供高性能的web服务之外,另外还可以将 nginx 本身不具备的请求通过某种预定义的协议转发至其它服务器处理,不同的协议就是Nginx服务器与其他服务器进行通信的一种规范,主要在不同的场景使用以下模块实现不同的功能
ngx_http_proxy_module:  #将客户端的请求以http协议转发至指定服务器进行处理
ngx_http_upstream_module #用于定义为proxy_pass,fastcgi_pass,uwsgi_pass等指令引用的后端服务器分组
ngx_stream_proxy_module:#将客户端的请求以tcp协议转发至指定服务器处理
ngx_http_fastcgi_module:#将客户端对php的请求以fastcgi协议转发至指定服务器助理
ngx_http_uwsgi_module:  #将客户端对Python的请求以uwsgi协议转发至指定服务器处理
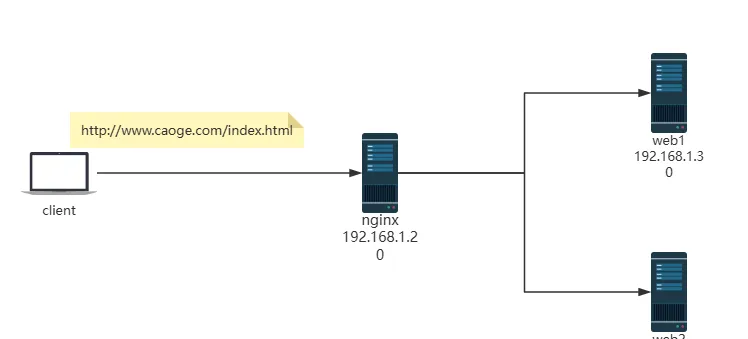
生成环境部署结构

访问逻辑图

(四层)LVS和(七层)nginx区别
监听端口参与三次握手和四次挥手应用数据修改后端是否能看到客户端真实地址性能端口修改

工作层:LVS四层,Nginx七层。
监听端口:LVS不监听,Nginx监听端口。
后端服务器看到客户端地址:LVS可以,Nginx不可以。
连接(三次握手):LVS 不参与连接,只负责转发,Nginx代替后端服务器和客户建立连接。
实现 http 反向代理
http 协议反向代理
Nginx 可以基于ngx_http_proxy_module模块提供http协议的反向代理服务
官方文档
https://nginx.org/en/docs/http/ngx_http_proxy_module.html
反向代理配置参数
#官方文档:https://nginx.org/en/docs/http/ngx_http_proxy_module.html#proxy_pass
Syntax: proxy_pass URL;
Default:  —
Context:  location, if in location, limit_except

#用来设置将客户端请求转发给的后端服务器的主机,可以是主机名(将转发至后端服务做为主机头首部)、IP:port 方式
#说明: proxy_pass http://FQDN/ 中的FQDN决定转发至后端哪个虚拟主机,而与用户请求的URL无关
#如果转到后端的哪个服务器由用户请求决定,可以向后端服务转发请求的主机头实现
#示例: proxy_set_header Host  $http_host;

#示例:
location  /web {
    index index.html;
    proxy_pass http://192.168.1.20:8080; #8080后面无uri,即无 / 符号,需要将location后面 url 附加到proxy_pass指定的url后面,此行为类似于root
#proxy_pass指定的uri不带斜线将访问的/web,等于访问后端服务器http://192.168.1.20:8080/web/index.html,即后端服务器配置的站点根目录要有web目录才可以被访问
#http://nginx/web/index.html ==> http://192.168.1.20:8080/web/index.html

proxy_pass http://192.168.1.20:8080/;   #8080后面有uri,即有 / 符号,相当于置换,即访问/web时实际返回proxy_pass后面uri内容.此行为类似于alias
#proxy_pass指定的uri带斜线,等于访问后端服务器的http://192.168.1.50:8080/index.html 内容返回给客户端
}
# http://nginx/web/index.html ==> http://192.168.1.50:8080

#重启Nginx测试访问效果:
#curl -L  http://www.caoge.com/web

#如果location定义其uri时使用了正则表达式模式(包括~,~*,但不包括^~),则proxy_pass之后必须不能使用uri; 即不能有/ ,用户请求时传递的uri将直接附加至后端服务器之后
server {
 ...
  server_name HOSTNAME;
  location ~|~* /uri/ {
    proxy_pass http://host:port; #proxy_pass后面的url 不能加/
}
   ...
}
http://HOSTNAME/uri/ --> http://host/uri/

proxy_hide_header field;
#用于nginx作为反向代理的时候,在返回给客户端http响应时,隐藏后端服务器相应头部的信息,可以设置在http,server或location块

#示例: 隐藏后端服务器ETag首部字段
location /web {
    index index.html;
    proxy_pass http://192.168.1.20:8080/;
    proxy_hide_header ETag;
}

proxy_pass_header field;
#默认nginx在响应报文中不传递后端服务器的首部字段Date, Server, X-Pad,  X-Accel等参数,如果要传递的话则要使用 proxy_pass_header field声明将后端服务器返回的值传递给客户端
#field 首部字段大小不敏感

#示例:透传后端服务器的Server和Date首部给客户端,同时不再响应报中显示前端服务器的Server字段
proxy_pass_header Server;
proxy_pass_header Date;

proxy_pass_request_body on | off;
#是否向后端服务器发送HTTP实体部分,可以设置在http,server或location块,默认即为开启

proxy_pass_request_headers on | off;
#是否将客户端的请求头部转发给后端服务器,可以设置在http,server或location块,默认即为开启

proxy_set_header;
#可更改或添加客户端的请求头部信息内容并转发至后端服务器,比如在后端服务器想要获取客户端的真实IP的时候,就要更改每一个报文的头部

#示例:
#proxy_set_header X-Forwarded-For $proxy_add_x_forwarded_for;
$proxy_add_x_forwarded_for
the “X-Forwarded-For” client request header field with the $remote_addr variable
appended to it, separated by a comma. If the “X-Forwarded-For” field is not
present in the client request header, the $proxy_add_x_forwarded_for variable is
equal to the $remote_addr variable.

proxy_set_header X-Real-IP  $remote_addr;
#添加HOST到报文头部,如果客户端为NAT上网那么其值为客户端的共用的公网IP地址,常用于在日之中记录客户端的真实IP地址。
#在后端httpd服务器修改配置,添加日志记录X-Forwarded-For字段
LogFormat "%h %l %u %t "%r" %>s %b "%{Referer}i" "%{User-Agent}i" "%{X
Real-IP}i"" combined

#在后端服务器查看日志
[root@ubuntu2404 ~]#tail /apps/nginx/logs/access.log -f
192.168.1.50 - - [06/Jul/2025:18:32:06 +0800] "GET / HTTP/1.0" 200 13 "-" "curl/8.5.0"

proxy_connect_timeout time;
#配置nginx服务器与后端服务器尝试建立连接的超时时间,默认为60秒,用法如下:
proxy_connect_timeout 60s;
#60s为自定义nginx与后端服务器建立连接的超时时间,超时会返回客户端504响应码

proxy_read_timeout time;
#配置nginx服务器向后端服务器或服务器组发起read请求后,等待的超时时间,默认60s

proxy_send_timeout time;
#配置nginx项后端服务器或服务器组发起write请求后,等待的超时 时间,默认60s

proxy_http_version 1.0;
#用于设置nginx提供代理服务的HTTP协议的版本,默认http 1.0,建议修改1.1支持长连接
#注意:需要配合实现proxy_set_header Connection "" 实现长连接

proxy_ignore_client_abort off;
#当客户端网络中断请求时,nginx服务器中断其对后端服务器的请求。即如果此项设置为on开启,则服务器会忽略客户端中断并一直等着代理服务执行返回,如果设置为off,则客户端中断后Nginx也会中断客户端请求并立即记录499日志,默认为off。

proxy_headers_hash_bucket_size 128;
#当配置了 proxy_hide_header和proxy_set_header的时候,用于设置nginx保存HTTP报文头的hash表的上限

proxy_headers_hash_max_size 512;
#设置proxy_headers_hash_bucket_size的最大可用空间

server_namse_hash_bucket_size 512;
#server_name hash表申请空间大小

server_names_hash_max_size  512;
#设置服务器名称hash表的上限大小

proxy_next_upstream error | timeout | invalid_header | http_500 | http_502 | http_503 | http_504;
#当一台后端服务器出错,超时,无效首部,500等时,切换至下一个后端服务器提供服务
实战案例: 反向代理单台 web 服务器
[root@rocky9 app]# vim caoge.cn.conf
server {
    listen 80;
    server_name caoge.cn;
    #root /data/nginx/;
    location / {
        proxy_pass http://192.168.101.10/;
        proxy_set_header Host  $http_host;
   }
}
#重启Nginx 并访问测试
实战案例: 指定 location 实现反向代理
针对指定的location
server {
  listen 80;
  server_name  caoge.cn;
  location / {
    index index.html index.php;
    root /data/nginx/html/pc;
}
 location /static {
   #proxy_pass http://192.168.1.20/; #注意有后面的/, 表示置换
   proxy_pass http://192.168.1.20;  #后面没有 / , 表示附加
 }
}
#后端web服务器必须要有相对于的访问URL
[root@rocky9 html]# mkdir /var/www/html/static
[root@rocky9 html]# echo "web1 page for apache" > /var/www/html/index.html
[root@rocky9 html]# echo "web2 page for apache" > /var/www/html/static/index.html

#重启Nginx并访问测试:
[root@centos7 ~]# curl -L  http://caoge.cn/
pc web
[root@centos7 ~]# curl -L  http://caoge.cn/static
web2 page for apache
针对特定的资源实现代理

[root@rocky9 app]# vim m.caoge.cn.conf
server {
 ......
  location ~ .(jpe?g|png|bmp|gif)$ {
            proxy_pass http://192.168.1.20;     #如果加/ 语法出错
  }
}
#如果 http://192.168.1.20/ 有/语法出错
[root@ubuntu2404 conf.d]#nginx -t
nginx: [emerg] "proxy_pass" cannot have URI part in location given by regular expression, or inside named location, or inside "if" statement, or inside "limit_except" block in /data/conf.d/www.caoge.com.proxy.conf:5
nginx: configuration file /apps/nginx/conf/nginx.conf test failed
反向代理示例: 缓存功能
缓存功能默认关闭状态,需要先动配置才能启用
proxy_cache_path;
#定义可用于proxy功能的缓存;Context:http
proxy_cache_path path [levels=levels] [use_temp_path=on|off]
keys_zone=zone_name:size [inactive=time] [max_size=size] [manager_files=number]
[manager_sleep=time] [manager_threshold=time] [loader_files=number]
[loader_sleep=time] [loader_threshold=time] [purger=on|off]
[purger_files=number] [purger_sleep=time] [purger_threshold=time];

#示例:在http配置定义缓存信息
proxy_cache_path /var/cache/nginx/proxy_cache #定义缓存保存路径,proxy_cache会自动创建
    levels=1:2:2 #定义缓存目录结构层次,1:2:2可以生成2^4x2^8x2^8=2^20=1048576个目录
    keys_zone=proxycache:20m #指内存中缓存的大小,主要用于存放key和metadata(如:使用次数),一般1M可存放8000个左右的key
    inactive=120s  #缓存有效时间
    max_size=10g;  #最大磁盘占用空间,磁盘存入文件内容的缓存空间最大值
proxy_cache zone_name | off;  默认off
#指明调用的缓存,或关闭缓存机制;Context:http, server, location
#zone_name 表示缓存的名称.需要由proxy_cache_path事先定义
proxy_cache_key string;
#缓存中用于“键”的内容,默认值:proxy_cache_key $scheme$proxy_host$request_uri;
proxy_cache_valid [code ...] time;
#定义对特定响应码的响应内容的缓存时长,定义在http{...}中

示例:
proxy_cache_valid 200 302 10m;
proxy_cache_valid 404 1m;
#调用缓存功能,需要定义在相应的配置段,如server{...};或者location等
proxy_cache proxycache;
proxy_cache_key $request_uri; #对指定的数据进行MD5的运算做为缓存的key
proxy_cache_valid 200 302 301 10m; #指定的状态码返回的数据缓存多长时间
proxy_cache_valid any 1m;   #除指定的状态码返回的数据以外的缓存多长时间,必须设置,否则不会缓存
proxy_cache_use_stale error | timeout | invalid_header | updating | http_500 |
http_502 | http_503 | http_504 | http_403 | http_404 | off ; #默认是off
#在被代理的后端服务器出现哪种情况下,可直接使用过期的缓存响应客户端

#示例
proxy_cache_use_stale error http_502 http_503;
proxy_cache_methods GET | HEAD | POST ...;
#对哪些客户端请求方法对应的响应进行缓存,GET和HEAD方法总是被缓存
扩展知识: 清理缓存
方法1: rm -rf 缓存目录
方法2: 第三方扩展模块ngx_cache_purge
非缓存场景压测
#准备后端httpd服务器
[root@rocky9 html]# pwd
/usr/share/nginx/html
[root@rocky9 html]# cat /var/log/messages> static/log.html 准备测试页面
#客户端
[root@centos7 ~]# yum install -y httpd-tools
[root@centos7 ~]# ab -n 100 -c 100 caoge.cn/log.html
......
Concurrency Level:      100
Time taken for tests:   1.934 seconds
Complete requests:      100
Failed requests:        0
Write errors:           0
Total transferred:      34678700 bytes
HTML transferred:       34655600 bytes
Requests per second:    51.69 [#/sec] (mean)
Time per request:       1934.496 [ms] (mean)
Time per request:       19.345 [ms] (mean, across all concurrent requests)
Transfer rate:          17506.33 [Kbytes/sec] received
......
准备缓存配置
[root@rocky9 app]# vim caoge.cn.conf
proxy_cache_path /data/nginx/proxycache   levels=1:1:1  keys_zone=proxycache:20m inactive=120s  max_size=1g;#配置在nginx.conf http配置段
server {
    listen 80;
    server_name caoge.cn;
    location / {    #要缓存的URL 或者放在server配置项对所有URL都进行缓存
        proxy_pass http://192.168.1.20;
        proxy_cache proxycache;
        proxy_cache_key $request_uri;
        #proxy_cache_key $host$uri$is_args$args;
        proxy_cache_valid 200 302 301 10m;
        proxy_cache_valid any 5m;  #必须指定哪些响应码的缓存
        proxy_set_header Host  $http_host; #转发主机头至后端服务器
        #proxy_set_header clientip $remote_addr;
   }
}
[root@rocky9 app]#mkdir /data/nginx
[root@rocky9 app]# nginx -s reload
#/data/nginx/proxycache/目录自动生成
[root@rocky9 ~]# ls /data/nginx/proxycache/
[root@rocky9 ~]# tree /data/nginx/proxycache/
/data/nginx/proxycache/

0 directories, 0 files
访问并验证缓存文件
#访问web并验证缓存目录
[root@centos7 ~]# curl caoge.cn/log.html
[root@centos7 ~]# ab -n 100 -c 100 caoge.cn/log.html
.....
Server Software:        nginx
Server Hostname:        caoge.cn
Server Port:            80

Document Path:          /log.html
Document Length:        346556 bytes

Concurrency Level:      100
Time taken for tests:   1.199 seconds
Complete requests:      100
Failed requests:        0
Write errors:           0
Total transferred:      34678700 bytes
HTML transferred:       34655600 bytes
Requests per second:    83.40 [#/sec] (mean) #性能提高近一倍
Time per request:       1198.995 [ms] (mean)
Time per request:       11.990 [ms] (mean, across all concurrent requests)
Transfer rate:          28245.25 [Kbytes/sec] received

#验证缓存目录结构及文件大小
[root@rocky9 ~]# tree /data/nginx/proxycache/
/data/nginx/proxycache/
├── 2
│   └── 9
│       └── d
│           └── 8af02a9e0af8a09cc963ec4cc0257d92
#验证文件内容
[root@rocky9 ~]# file /data/nginx/proxycache/2/9/d/8af02a9e0af8a09cc963ec4cc0257d92
/data/nginx/proxycache/2/9/d/8af02a9e0af8a09cc963ec4cc0257d92: Hitachi SH big-endian COFF object file, not stripped, 0 section, symbol offset=0x73ce4d67
[root@rocky9 ~]# head -n 20 /data/nginx/proxycache/2/9/d/8af02a9e0af8a09cc963ec4cc0257d92  会在文件首部添加相应码
돍gƍg͍gZYē`N"674dc78e-549bc"
KEY: /log.html
HTTP/1.1 200 OK
Server: nginx/1.20.1
Date: Mon, 02 Dec 2024 15:13:20 GMT
Content-Type: text/html
Content-Length: 346556
Last-Modified: Mon, 02 Dec 2024 14:43:26 GMT
Connection: close
ETag: "674dc78e-549bc"
Accept-Ranges: bytes
添加响应报文的头部信息
nginx基于模块ngx_http_headers_module可以实现对后端服务器响应给客户端的报文中添加指定的响应首部字段。
参考链接:https://nginx.org/en/docs/http/ngx_http_headers_module.html
Syntax:  add_header name value [always];
Default: —
Context: http, server, location, if in location

#添加响应报文的自定义首部:
add_header name value  [always];

#示例:
add_header X-Via   $server_addr; #当前nginx主机的IP
add_header X-Cache $upstream_cache_status; #缓存命中HIT,未命中MISS
add_header X-Accel $server_name; #客户访问的FQDN

#添加自定义响应信息的尾部,使用较少,1.13.2版后支持
add_trailer name value [always];
nginx配置
location / {
      proxy_pass http://192.168.1.10;
      proxy_cache proxycache;
      proxy_cache_key $request_uri;
      #proxy_cache_key $host$uri$is_args$args;
      proxy_cache_valid 200 302 301 10m;
      proxy_cache_valid any 5m;  #必须指定哪些响应码的缓存
      add_header X-Via  $server_addr;
      add_header X-Cache $upstream_cache_status;
      add_header X-Accel $server_name;
      #proxy_set_header Host  $http_host; #转发主机头至后端服务器
      #proxy_set_header clientip $remote_addr;
}
验证头部信息
[root@centos7 ~]# curl caoge.cn/log.html -I
HTTP/1.1 200 OK
Server: nginx
Date: Mon, 02 Dec 2024 19:55:43 GMT
Content-Type: text/html
Content-Length: 346556
Connection: keep-alive
Last-Modified: Mon, 02 Dec 2024 14:43:26 GMT
ETag: "674dc78e-549bc"
X-Via: 192.168.101.5
X-Cache: MISS          #第一次无缓存
X-Accel: caoge.cn
Accept-Ranges: bytes

[root@centos7 ~]# curl caoge.cn/log.html -I
HTTP/1.1 200 OK
Server: nginx
Date: Mon, 02 Dec 2024 19:58:26 GMT
Content-Type: text/html
Content-Length: 346556
Connection: keep-alive
Last-Modified: Mon, 02 Dec 2024 14:43:26 GMT
ETag: "674dc78e-549bc"
X-Via: 192.168.101.5
X-Cache: HIT           #第二次命令缓存
X-Accel: caoge.cn
Accept-Ranges: bytes
实现反向代理客户端 IP 透传
一级代理实现客户端IP透传

[root@rocky9 app]# vim caoge.cn.conf
server {
    listen 80;
    server_name caoge.cn;
    #root /data/nginx/;
    location / {
        proxy_pass http://192.168.101.10;
        proxy_set_header Host  $http_host; #转发主机头至后端服务器
        proxy_set_header X-Real-IP  $remote_addr;  #只添加客户端IP到请求报文头部,转发至后端服务器
        #proxy_set_header X-Forwarded-For $proxy_add_x_forwarded_for; #添加客户端IP和反向代理服务器IP到请求报文头部
   }
}
#说明$proxy_add_x_forwarded_for
#此变量表示将客户端IP追加请求报文中X-Forwarded-For首部字段,多个IP之间用逗号分隔,如果请求中没有X-Forwarded-For,就使用$remote_addr

[root@rocky9 app]# nginx -s reload

#后端nginx配置
[root@rocky9 nginx]# vim nginx.conf
log_format  main  '$remote_addr - $remote_user [$time_local] "$request" '
                      '$status $body_bytes_sent "$http_referer" '
                      '"$http_user_agent" "$http_x_forwarded_for" "$http_x_real_ip "' ; #添加这个"$http_x_real_ip"

#重启nginx访问web界面并验证日志格式
[root@centos7 ~]# curl caoge.cn
192.168.101.10

[root@rocky9 nginx]# tail -f /var/log/nginx/access.log
192.168.101.5 - - [03/Dec/2024:04:10:35 +0800] "GET / HTTP/1.0" 200 16 "-" "curl/7.29.0" "-" "192.168.101.14 "
多级代理实现客户端 IP 透传

#第一个代理服务器
[root@nginx1 ~]#vim /apps/nginx/conf/nginx.conf
#开启日志格式,记录x_forwarded_for
 http {
    include       mime.types;
    default_type  application/octet-stream;
    proxy_cache_path /data/nginx/proxycache
    levels=1:1:1
    keys_zone=proxycache:20m inactive=120s  max_size=1g;
    log_format  main  '$remote_addr - $remote_user [$time_local] "$request" '
                      '$status $body_bytes_sent "$http_referer" '
                      '"$http_user_agent" "$http_x_forwarded_for"';
    access_log  logs/access.log  main;
#定义反向代理
[root@nginx1 ~]#vim /apps/nginx/conf/conf.d/pc.conf
server {
   location / {
      proxy_pass http://10.0.0.18;
      proxy_set_header X-Forwarded-For $proxy_add_x_forwarded_for;
      }
    .......
}

#第二个代理服务器
[root@nginx2 ~]#vim /apps/nginx/conf/nginx.conf
#开启日志格式,记录x_forwarded_for
 http {
    include       mime.types;
    default_type  application/octet-stream;
    proxy_cache_path /data/nginx/proxycache
    levels=1:1:1
    keys_zone=proxycache:20m inactive=120s  max_size=1g;
    log_format  main  '$remote_addr - $remote_user [$time_local] "$request" '
                      '$status $body_bytes_sent "$http_referer" ' '"$http_user_agent"
                      "$http_x_forwarded_for"';
    access_log  logs/access.log  main;

 #定义反向代理
[root@nginx2 ~]#vim /etc/nginx/nginx.conf
  server {
        location / {
          proxy_pass http://10.0.0.28;
          proxy_set_header X-Forwarded-For $proxy_add_x_forwarded_for;
        }
}

#在第一个proxy上面查看日志
[root@nginx1 ~]#tail /apps/nginx/logs/access.log -f
10.0.0.7 - - [11/Oct/2020:14:37:00 +0800] "GET /index.html HTTP/1.1" 200 11 "-" "curl/7.58.0" "-"
#在第二个proxy上面查看日志
[root@nginx2 ~]#tail /apps/nginx/logs/access.log -f
10.0.0.8 - - [11/Oct/2020:14:37:00 +0800] "GET /index.html HTTP/1.0" 200 11 "-" "curl/7.58.0" "10.0.0.7"
#后端服务器配置日志格式
[root@rocky9 nginx]# vim nginx.conf
log_format  main  '$remote_addr - $remote_user [$time_local] "$request" '
                      '$status $body_bytes_sent "$http_referer" '
                      '"$http_user_agent" "$http_x_forwarded_for"' ; #添加这个"$http_x_forwarded_for"

#测试访问
[root@centos7 ~]#curl caoge.cn/index.html
<h1> web site on 10.0.0.28 </h1>
#后端服务器查看日志
[root@rocky9 nginx]# tail -f /var/log/nginx/access.log
192.168.101.5 - - [03/Dec/2024:04:20:49 +0800] "GET / HTTP/1.0" 200 16 "-" "curl/7.29.0" "192.168.101.14"
利用Nginx解决跨域问题
什么是跨域
当一个请求url的协议、域名、端口三者之间任意一个与当前页面url不同即为跨域。
通常由于同域安全策略(the same-origin security policy),浏览器会禁止跨域请求。
值得注意的是:虽然因为跨域的原因会导致浏览器禁止访问而获取数据失败,但返回的状态码仍为200。
常见的解决方案有:CORS,JSONP,Nginx反向代理等。
采用CORS(Cross-Origin Resource Sharing 跨域资源共享)技术,可以允许当前域的Web相关资源被其他域的脚本请求访问 CORS是一种基于HTTP头的机制,该机制允许使用AJAX发送跨域请求,只要HTTP响应头中包含了相应的 CORS响应头。CORS需要浏览器和服务器同时支持,CORS机制在老版本的浏览器中不支持,现代浏览器都支持CORS。
在使用CORS发送AJAX请求时浏览器端代码和过去一致,服务器端需要配置CORS的响应头。
参考链接
https://developer.mozilla.org/zh-CN/docs/Web/HTTP/CORS

使用 Nginx 反向代理功能解决跨域问题案例
#在www.caoge.com主机执行程序提供JSON数据服务
[root@ubuntu2404 ~]#./web_demo
[GIN-debug] [WARNING] Creating an Engine instance with the Logger and Recovery
middleware already attached.
[GIN-debug] [WARNING] Running in "debug" mode. Switch to "release" mode in
production.- using env:
export GIN_MODE=release- using code:  gin.SetMode(gin.ReleaseMode)
[GIN-debug] GET    /hello                    --> main.sayHello (3 handlers)
[GIN-debug] [WARNING] You trusted all proxies, this is NOT safe. We recommend you
to set a value.
Please check https://pkg.go.dev/github.com/gin-gonic/gin#readme-don-t-trust-all
proxies for details.
[GIN-debug] Environment variable PORT is undefined. Using port :8080 by default
[GIN-debug] Listening and serving HTTP on :8080

#在www.cao.com主机的创建页面文件,此文件存在跨域问题
[root@ubuntu2404 ~]#cat /usr/share/nginx/html/cors.html
 <!DOCTYPE html>
 <html lang="en">
 <head>
    <meta charset="UTF-8">
    <title>Cross-origin resource sharing</title>
 </head>
 <body>
    <script src="https://code.jquery.com/jquery-2.2.4.min.js"></script>
    <script>
        $.ajax({
        url:'http://www.caoge.com:8080/hello', #指向第二个域名的资源
        type:'get',
        data:{},
        success:function(res){
            //res = JSON.parse(res);
            console.log('请求成功',res)
        },
        error:function(er){
            console.log('请求错误')
        }
      })
    </script>
 </body>
 </html>
#访问http://www.caoge.com/cors.html,可以观察到如下情况,响应码虽然返回为200,但是浏览器阻止了数据,无法正常显示
配置nginx解决跨域问题
#在www.cao.com主机的nginx反向代理解决跨域
[root@ubuntu2004 ~]#vim /etc/nginx/nginx.conf
server {
    listen 80;
    server_name www.cao.com;
    root  /usr/share/nginx/html;
    location /hello {
          proxy_pass http://www.caoge.com:8080; #指向第二个域
 }
}

#在www.cao.com主机上修改网页如下
[root@ubuntu2004 ~]#cat /usr/share/nginx/html/cors.html
 <!DOCTYPE html>
 <html lang="en">
 <head>
    <meta charset="UTF-8">
    <title>Cross-origin resource sharing</title>
 </head>
 <body>
    <script src="https://code.jquery.com/jquery-2.2.4.min.js"></script>
    <script>
        $.ajax({
        url:'http://www.cao.com/hello', #只修改此行指向网页所在的同一个域名
        type:'get',
        data:{},
        success:function(res){
            //res = JSON.parse(res);
            console.log('请求成功',res)
        },
        error:function(er){
            console.log('请求错误')
        }
      })
    </script>
 </body>
 </html>
Http 反向代理负载均衡
Nginx可以将客户端的请求转发至单台后端服务器但是无法转发至特定的一组的服务器, 而且不能对后端服务器提供相应的服务器状态监测。
Nginx 可以基于ngx_http_upstream_module模块提供服务器分组转发、权重分配、状态监测、调度算法等高级功能。
官方文档: https://nginx.org/en/docs/http/ngx_http_upstream_module.html
http upstream配置参数
#自定义一组服务器,配置在http块内
upstream name {
   server .....

}
#示例
upstream backend {
    server backend1.example.com weight=5;
    server 127.0.0.1:8080  max_fails=3 fail_timeout=30s;
    server unix:/tmp/backend3;
    server backup1.example.com  backup;
}
server address [parameters];
#配置一个后端web服务器,配置在upstream内,至少要有一个server服务器配置

#server支持的parameters如下:
weight=number #设置权重,默认为1,实现类似于LVS中的WRR,WLC等
max_conns=number  #给当前后端server设置最大活动链接数,默认为0表示没有限制
max_fails=number  #后端服务器的下线条件,当客户端访问时,对本次调度选中的后端服务器连续进行检测多少次,如果都失败就标记为不可用,默认为1次,当客户端访问时,才会利用TCP触发对探测后端服务器健康性检查,而非周期性的探测
fail_timeout=time #后端服务器的上线条件,对已经检测到处于不可用的后端服务器,每隔此时间间隔再次进行检测是否恢复可用,如果发现可用,则将后端服务器参与调度,默认为10秒
backup  #设置为备份服务器,当所有后端服务器不可用时,才会启用此备用服务器,和ip_hash指令冲突,不能同时使用
down    #标记为down状态,可以平滑下线后端服务器,新用户不再调度到此主机,正在访问的旧用户不受影响
ip_hash;
#源地址hash调度方法,基于的客户端的remote_addr(源地址IPv4的前24位或整个IPv6地址)做hash计算,以实现会话保持,注意:如果是局域网可能会导致调度到同一台主机
#hash $remote_addr 则是对全部32bit的IPv4进行hash计算
#注意:和backup指令冲突,不能同时使用
least_conn;
#最少连接调度算法,优先将客户端请求调度到当前连接最少的后端服务器,相当于LVS中的WLC
hash KEY [consistent];
#基于指定请求报文中首部字段或者URI等key做hash计算,使用consistent参数,将使用ketama一致性
#hash算法,适用于后端是Cache服务器(如varnish)时使用,consistent定义使用一致性hash运算,一致性hash基于取模运算

#示例
hash $request_uri consistent; #基于用户请求的uri做hash,可以实现调度到后端缓存服务器功能
hash $remote_addr consistent; #则是对全部32bit的IPv4进行一致性hash计算
hash $cookie_sessionid        #基于cookie中的sessionid这个key进行hash调度,实现会话绑定
Syntax: keepalive connections;
Default:    —
Context:    upstream
This directive appeared in version 1.1.4.

keepalived  #该connections参数设置保留在每个工作进程缓存中的上游服务器的最大空闲保活连接数。当超过这个数字时,最近最少使用的连接将被关闭。

Syntax: keepalive_timeout timeout;
Default:  keepalive_timeout 60s;
Context:  upstream
This directive appeared in version 1.15.3.

keepalive_timeout #设置一个超时时间,在此期间与上游服务器的空闲保活连接将保持打开状态。
[root@rocky9 app]# vim caoge.cn.conf
upstream backed {
        server 192.168.101.10:80;
        server 192.168.101.8:80;
}
server {
    listen 80;
    server_name caoge.cn;
    location / {
        proxy_pass http://backed;
        proxy_set_header Host  $http_host; #转发主机头至后端服务器
   }
}
[root@rocky9 app]# nginx -s reload
[root@centos7 ~]# curl caoge.cn
192.168.101.10
[root@centos7 ~]# curl caoge.cn
192.168.101.8
基于 hash 的调度算法
#对总权重3取模得出以下结果,再进行调度至后端服务器
{3,6,9}%3=0
{1,4,7,10}%3=1
{2,5,8}%3=2

添加节点后,会导致很多的调度的缓存信息失效
#对总权重4取模得出以下结果,再进行调度至后端服务器,和上面对3取模结果差异很大,80%都发生了变化
{4,8}%4=0
{1,5,7}%4=1
{2,6,10}%4=2
{3,7}%4=3

一致性hash算法

反向代理示例:后端多台 web服务器
环境部署
192.168.1.20  #Nginx 代理服务器
192.168.1.30  #后端web A,nginx部署
192.168.1.40  #后端web B,nginx部署
部署后端 nginx服务器
[root@rocky9 ~]# yum install -y nginx
[root@rocky9 ~]# hostname -I > /usr/share/nginx/html/
[root@rocky9 ~]# nginx
[root@rocky9 ~]# curl 192.168.101.10
192.168.101.10

[root@rocky9 ~]# yum install -y nginx
[root@rocky9 ~]# hostname -I > /usr/share/nginx/html/
[root@rocky9 ~]# nginx
[root@rocky9 ~]# curl 192.168.101.8
192.168.101.8
配置 nginx 反向代理
注意: 本节实验过程中先关闭缓存
[root@rocky9 app]# vim caoge.cn.conf
upstream backed {
        server 192.168.101.10:80 weight=1 fail_timeout=5s max_fails=3;# 后端服务器状态监测
        server 192.168.101.8:80 weight=1 fail_timeout=5s max_fails=3;
        #server 192.168.101.8:80 backup;
        keepalive 100;   #该connections参数设置保留在每个工作进程缓存中的上游服务器的最大空闲保活连接数。当超过这个数字时,最近最少使用的连接将被关闭。
        keepalive_timeout 60s;  #空闲连接超时时长
}
server {
    listen 80;
    server_name caoge.cn;
    location / {
        proxy_pass http://backed;
        proxy_set_header Host  $http_host; #转发主机头至后端服务器
        proxy_next_upstream error | timeout | invalid_header | http_500 | http_502 |
                                 http_503 | http_504;
        proxy_http_version 1.1;         #指定使用http1.1版本才能支持长连接
        proxy_set_header Connection ""; #和上面的keepalived指令配合实现代理和后端服务器的长连接功能
   }
}

#重启Nginx 并访问测试
[root@rocky9 app]#nginx -s reload
[root@centos7 ~]# curl caoge.cn
192.168.101.10
[root@centos7 ~]# curl caoge.cn
192.168.101.8

#关闭192.168.101.8,测试nginx backup服务器可用性:
[root@centos7 ~]# while true;do curl caoge.cn;sleep 1;done
基于Cookie实现会话绑定
[root@rocky9 app]# vim caoge.cn.conf
upstream backed {
        hash $cookie_hello;   #hello是cookie的key的名称
        server 192.168.101.10:80 weight=1 fail_timeout=5s max_fails=3;
        server 192.168.101.8:80 weight=1 fail_timeout=5s max_fails=3;
        #server 192.168.101.8:80 backup;
        keepalive 100;
        keepalive_timeout 60s;
}
server {
    listen 80;
    server_name caoge.cn;
    location / {
        proxy_pass http://backed;
        proxy_set_header Host  $http_host; #转发主机头至后端服务器
   }
}
#重启nginx
[root@rocky9 app]# nginx -s reload
#测试
[root@centos7 ~]# curl -b hello=li caoge.cn
192.168.101.8
[root@centos7 ~]# curl -b hello=l caoge.cn
192.168.101.10
实现 HTTPS 的负载均衡

[root@centos8 ~]#vim /apps/nginx/conf.d/proxy.conf
upstream websrvs {
 server 10.0.0.101:80 ;
 server 10.0.0.102:80 ;
}
 server {
   listen 80;
   server_name www.wang.org;
   return 302 https://$server_name$request_uri;
}
 server {
   listen 443 ssl http2;
   server_name www.caoge.com;
   ssl_certificate    /apps/nginx/ssl/www.wang.org.pem;
   ssl_certificate_key /apps/nginx/ssl/www.wang.org.key;
   ssl_session_cache shared:sslcache:20m;
   ssl_session_timeout 10m;
   location / {
        proxy_pass http://websrvs;
        proxy_set_header Host  $http_host;
}
}
反向代理的应用场景
负载均衡:通过Nginx的反向代理功能,可以将请求分发到多台后端服务器上,从而达到负载均衡的目的。提高安全性:隐藏后端服务器的真实地址,增强系统的安全性。缓存加速:利用Nginx的缓存功能,减少对后端服务器的请求次数,加快响应速度。SSL终止:让Nginx处理SSL加密和解密过程,减轻后端服务器的负担。
结语
Nginx的反向代理功能为现代Web服务提供了强大的支持,无论是提升性能还是加强安全性都有着不可替代的作用。希望通过本文的介绍,你能够更加深入地理解Nginx反向代理的工作原理及其实现方式,并能根据自己的需求灵活运用。
如果你有任何问题或者想要了解更多信息,请随时关注我们的博客更新!我们将持续分享更多关于Nginx及其他技术话题的内容。
© 版权声明
文章版权归作者所有,未经允许请勿转载。
相关文章


暂无评论...