在运维过程中,无论是监控还是报表,都会有一些通过邮件发送图表的需求,由于开源的 zabbix,grafana 和 kibana 等并不完全具有“想发送哪儿就发送哪儿”的图片生成功能,在 grafana 中我们也思考了一些其他方法,列如 grafana webdav 和 grafana-image-renderer 的方案,但并不能满足我们的需求。
我们通过 nodejs 的模块 puppeteer + nodemailer 实现了grafana pannel 图表的邮件报表功能,基本满足了我们在自动化报表这块的需求。
原理
Puppeteer 是一个提供了高级 API ,通过DevTools Protocol(开发工具协议)控制headless chrome 或 chromium 的 Node.js 库,默认的运行模式是无头的,但是可以配置成非无头的模式。
无头浏览器是一种没有操作界面的浏览器,诸如selenium、PhantomJS、Puppeteer 等,常用于网页自动化测试,利用其提供的API,可以自动执行操作指令,它是测试利器,也是爬虫神器 。
Puppeteer 是其中比较优秀的一个。
Puppeteer 通过程序化地操作浏览器,与其进行模拟交互(例如点击、打字、导航等等)来控制要抓取的网页,一般也能获取网页的 DOM 或 HTML,因此也可以获取网页数据,对于一些动态网站来说,像 grafana 图表,JS 动态渲染的数据一般不能轻松获取,而自动化测试工具Puppeteer则可以轻松的做到,由于它是将 HTML 输入浏览器里运行的。
如果大家对 DevTools Protocol(开发工具协议)感兴趣,可以参考:
https://chromedevtools.github.io/devtools-protocol/
准备环境
环境版本
centos7.6node14.3.0cnpm6.1.1
cd /optwget https://cdn.npm.taobao.org/dist/node/v14.3.0/node-v14.3.0-linux-x64.tar.xztar -xf node-v14.3.0-linux-x64.tar.xzvi /etc/profile#set for nodejsexport NODE_HOME=/opt/node-v14.3.0-linux-x64export PATH=$NODE_HOME/bin:$PATHsource /etc/profilenpm config set registry=http://registry.npm.taobao.orgnpm install -g cnpm --registry=https://registry.npm.taobao.org# 截图存放位置mkdir /tmp/png/# 项目位置mkdir /opt/GrafanaSnapProjectcd /opt/GrafanaSnapProjectcnpm i --save puppeteercnpm i --save nodemailer源码逻辑
为了使逻辑更清晰,我把发邮件和获取截图分成两个模块 mailPush.js 和 getPicture.js
发邮件模块 mailPush.js 这块需要注意为每一个附件添加一个引用名称,便于把截图引用到正文里。
在nodejs 里使用${str1}${str2} hello进行字符串拼接。
/*function: send pictures in mail's html content via nodejsauthor: zuoguocai@126.com*/const nodemailer = require('nodemailer');//定义您的邮件推送服务器let transporter = nodemailer.createTransport({ // 您的邮箱服务器地址 host: 'mail.exchangehost.com', port: 587, secure: false, auth: { user: 'yourEmail', //您的邮箱的账号 pass: 'yourPassword'//您的邮箱的密码 }, tls: { rejectUnauthorized: false }, });function sendMymail(who,subject,title){ let mailOptions = { from: '"autoreport" <report@exchangehost.com>', //邮件来源 to: who, //邮件发送到哪里,多个邮箱使用逗号隔开 subject: subject, // 邮件主题 html: `<h2 align="center" style="color:red;font-size:24px">${title}</h2><br> <h5 align="center" style="color:green;font-size:20px">报表1</h5><br> <img src="cid:001"/> <br><h5 align="center" style="color:green;font-size:20px">报表2</h5> <br> <img src="cid:002"/>`, // html类型的邮件正文 attachments: [{ filename: '001.png',//附件名称 path: '/tmp/png/001.png', //附件的位置 cid: '001', //为附件添加一个引用名称 },{ filename: '002.png',//附件名称 path: '/tmp/png/002.png', //附件的位置 cid: '002', //为附件添加一个引用名称 }] }; transporter.sendMail(mailOptions, (error, info) => { if (error) { return console.log(error); } console.log('Message %s sent: %s', info.messageId, info.response); });}//测试用//sendMymail('zuoguocai@126.com','每周报表','OpenStack 运营报表')// 自定义发邮件模块,供引入exports.sendMymail = sendMymail;// 作为引入模块使用//const sendModule = require('./mailPush.js');//sendModule.sendMymail('zuoguocai@126.com','每周报表','OpenStack 运营报表');puppeteer 是 Google Chrome 团队官方的无界面(Headless)Chrome 工具,很适合在Linux 字符终端使用,不需要在Linux 上安装桌面工具。
但需要在 Linux 中安装中文字体,如仿宋字体,避免在截图中出现乱码。
说到字体,中文字体实则有许多,列如方正的徐静蕾体,adoble 思源字体。
字体大家可以从网络上下载,阿里免费的可商用普惠字体,下载链接
https://alibabafont.taobao.com/
Linux 中安装中文字体
yum -y install fontconfigcd /usr/share/fontsmkdir chinesecd chinese/使用lrzsz 上传字体,如仿宋体chmod -R 775 /usr/share/fonts/chineseyum -y install ttmkfdirttmkfdir -e /usr/share/X11/fonts/encodings/encodings.dirvi /etc/fonts/fonts.conf<!-- Font directory list --><dir>/usr/local/share/fonts/chinese</dir>fc-list :lang=zh/usr/share/fonts/bitmap/fangsongti24.pcf.gz: Fangsong ti:style=Regular/usr/share/fonts/chinese/simfang.ttf: FangSong_GB2312:style=Regular/usr/share/fonts/bitmap/fangsongti16.pcf.gz: Fangsong ti:style=RegulargetPicture.js 模块主要用来模拟登陆,模拟操作。这里需要对用户名和密码参数化,在写这块逻辑时大家可以参考网络上 puppeteer 文档和一些案例。
定位按钮和点击按钮这块比较繁琐和复杂,大家可以借助工具 puppeteer recorder 插件来辅助生成代码。
本机电脑 chrome 扩展程序里安装 puppeteer recorder 插件,这里我们主要通过使用chrome 插件 puppeteer recorder 对 grafana 前端 CSS 选择器定位,模拟点击,确定元素位置,生成一些辅助代码。使用习惯跟 JMeter,LoadRunner 很像。
如图1

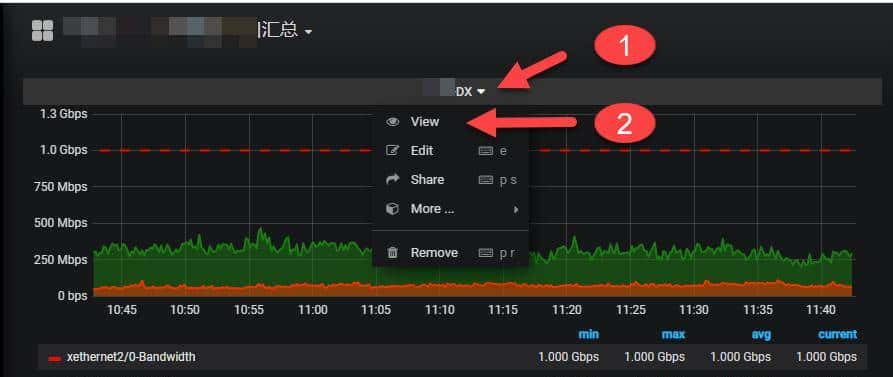
我们分析一下 grafana 某个 dashboard ,都是有好多 pannel 组成的,点击某个 pannel 的下拉菜单,点击 view 可以预览这个 pannel 的图表情况。这样我们就可以使用工具单独录制这段操作的代码,放到我们整个项目里。
如图2
/*function: snapshot grafana pannel pictures via puppeteerauthor: zuoguocai@126.com*/// 发送函数function sendPicture(){ // 引入自定义发邮件模块 const sendModule = require('./mailPush.js'); // 同时发送到多个邮箱,用逗号隔开 sendModule.sendMymail('guocai.zuo@gmail.com,zuoguocai@126.com','每周报表','^_^ OpenStack 监控报表');}// 截图函数function getPicture(){ const puppeteer = require('puppeteer'); //模拟登陆,grafana 登陆的用户名和密码 const account = `zuoguocai`; const password = `xxxxxx`; (async () => { const browser = await puppeteer.launch({args: ['--no-sandbox', '--disable-setuid-sandbox']}); const page = await browser.newPage(); await page.setViewport({width:1827, height:979}); await page.goto('https://yourgrafana.com'); await page.type('input[type="text"]', account); await page.type('#inputPassword', password); await page.click('button[type="submit"]'); await page.waitForNavigation({ waitUntil: 'load' }); //await page.waitFor(1000); // 替换为您的grafana dashboard的 url await page.goto('https://yourgrafana.com/d/-a3b-ddWz/hu-lian-wang-chu-kou-hui-zong?refresh=30s&orgId=1'); await page.waitFor(1000); // 替换为您的grafana dashboard panel 的编号,我这里是19 await page.waitForSelector('#panel-19 > .panel-height-helper:nth-child(1) > .panel-height-helper:nth-child(1) > .panel-height-helper:nth-child(1) > .panel-editor-container:nth-child(1) > .panel-height-helper:nth-child(1) > .panel-height-helper:nth-child(1) > .panel-container:nth-child(1) .panel-menu-container:nth-child(3) > .fa:nth-child(1)') // 替换为您的grafana dashboard panel 的编号,我这里是19 await page.click('#panel-19 > .panel-height-helper:nth-child(1) > .panel-height-helper:nth-child(1) > .panel-height-helper:nth-child(1) > .panel-editor-container:nth-child(1) > .panel-height-helper:nth-child(1) > .panel-height-helper:nth-child(1) > .panel-container:nth-child(1) .panel-menu-container:nth-child(3) > .fa:nth-child(1)') await page.waitForSelector('.open > .dropdown-menu > li:nth-child(1) > a > .dropdown-item-text') await page.click('.open > .dropdown-menu > li:nth-child(1) > a > .dropdown-item-text') await page.waitFor(1000); await page.screenshot({path: '/tmp/png/001.png'}); // 替换为您的grafana dashboard的 url await page.goto('https://yourgrafana.com/d/-a3b-ddWz/hu-lian-wang-chu-kou-hui-zong?refresh=30s&orgId=1'); await page.waitFor(1000); // 替换为您的grafana dashboard panel 的编号,我这里是2 await page.waitForSelector('#panel-2 > .panel-height-helper:nth-child(1) > .panel-height-helper:nth-child(1) > .panel-height-helper:nth-child(1) > .panel-editor-container:nth-child(1) > .panel-height-helper:nth-child(1) > .panel-height-helper:nth-child(1) > .panel-container:nth-child(1) .panel-menu-container:nth-child(3) > .fa:nth-child(1)') // 替换为您的grafana dashboard panel 的编号,我这里是2 await page.click('#panel-2 > .panel-height-helper:nth-child(1) > .panel-height-helper:nth-child(1) > .panel-height-helper:nth-child(1) > .panel-editor-container:nth-child(1) > .panel-height-helper:nth-child(1) > .panel-height-helper:nth-child(1) > .panel-container:nth-child(1) .panel-menu-container:nth-child(3) > .fa:nth-child(1)') await page.waitForSelector('.open > .dropdown-menu > li:nth-child(1) > a > .dropdown-item-text') await page.click('.open > .dropdown-menu > li:nth-child(1) > a > .dropdown-item-text') await page.waitFor(1000); await page.screenshot({path: '/tmp/png/002.png'}); await browser.close(); //调用发送函数 await sendPicture();})();}// 调用定位并截图函数getPicture()源码地址:
https://github.com/ZuoGuocai/GrafanaSnapProject
测试发送效果
node getPicture.js
打开邮件客户端,查看是否收到邮件报表。
关于定时发送和 grafana 时间范围选取
时间选取范围直接可以拼接到grafana的url里,这块比较简单。定时任务调度需要自己写,或者使用 gocron 的定时任务来做。
gocron 项目地址:
https://github.com/ouqiang/gocron
如图3

不止于此
puppeteer 很强劲,可以用于前端自动化测试,并且不局限于生成截图,还有pdf等,这里只是很小一部分内容,大家可以去探索,我这里只是一种思路,代码写的并不好,大家可以进行扩展,列如截取kibana等的图表,增加异常处理,对图片cid进行再次封装,放到对象存储里,工具集成到运维管理平台里,供业务相关方订阅。
作者简介:左国才,VIPKID运维工程师,笔名icai,主要研究Linux操作系统,数据库,云计算领域相关技术, 热爱开源技术,平时喜爱阅读高效运维公众号。
© 版权声明
文章版权归作者所有,未经允许请勿转载。
相关文章


暂无评论...