
在《初识MongoDB》中,我们介绍了MongoDB的概念、安装以及命令行下的操作方法。
我们可以把MongoDB当成普通的关系型数据库(例如MySQL)来使用,插入到MongoDB中的每一条数据都有固定的字段数,我们通过数据实体表明每个文档。
但如果这样,MongoDB适应数据库结构变化的优势就不能发挥出来了,这显然不是我们使用MongoDB的目标。
下面,我们基于SpringBoot,使用IDEA工具,实现向MongoDB插入非结构数据,并实现从MongoDB查询数据内容。
1、要实现的需求
我们从大学校园随机抽取4个学生,录入和查询这些学生的成绩。这些学生来自于各个系,每个人选修的课程五花八门,无论是课程名称还是课程数量,每个人都不同。
为了实现这个需求,采用关系型数据库,是比较难的事情,因此我们决定采用MongoDB来实现需求。
2、在mongoDB命令行下,执行下面的语句,建立db_student数据库,然后在db_student数据库中建立admin用户,口令为112233:
> use db_student
switched to db db_student
> db.createUser({user:"admin",pwd:"112233",roles:[{role:"readWrite",db:"db_student"}]})
Successfully added user: {
"user" : "admin",
"roles" : [
{
"role" : "readWrite",
"db" : "db_student"
}
]
}
3、在mongoDB命令行下,执行下面的语句,建立col_score集合:
> db.createCollection("col_score")
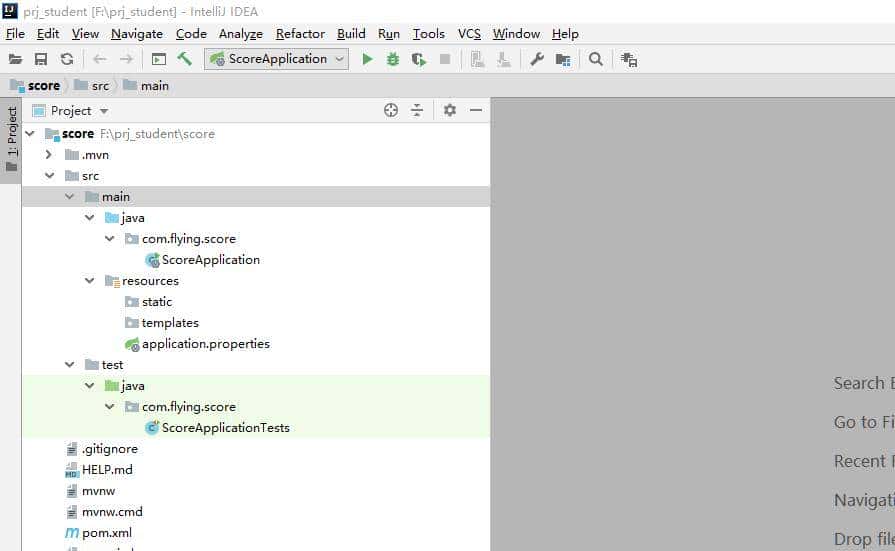
{ "ok" : 1 }4、使用IDEA建立一个空的项目prj_student,然后在项目下建立score模块,添加Lombok、Spring Web、Spring Data MongoDB三个依赖;模块建好之后IDEA中的视图如下:
5、增加dao、biz和controller包:

6、在dao包中添加ScoreDao类,代码如下:
package com.flying.score.dao;
import org.bson.Document;
import org.springframework.beans.factory.annotation.Autowired;
import org.springframework.data.mongodb.core.MongoTemplate;
import org.springframework.stereotype.Repository;
import java.util.List;
@Repository
public class ScoreDao{
@Autowired
private MongoTemplate mongoTemplate;
public void insertScore(Document document){
mongoTemplate.insert(document, "col_score");
}
public List<Document> getAll(){
List<Document> documentList = mongoTemplate.findAll(Document.class, "col_score");
return documentList;
}
}
7、在biz包中添加ScoreBiz类,代码如下:
package com.flying.score.biz;
import com.flying.score.dao.ScoreDao;
import org.bson.Document;
import org.springframework.beans.factory.annotation.Autowired;
import org.springframework.stereotype.Service;
import java.util.List;
@Service
public class ScoreBiz {
@Autowired
private ScoreDao scoreDao;
public void insertScores(){
Document document = new Document();
document.append("姓名", "张文");
document.append("院系", "中文系");
document.append("英语", 92);
document.append("古汉语", 88);
scoreDao.insertScore(document);
document = new Document();
document.append("姓名", "李静");
document.append("院系", "法律系");
document.append("英语", 62);
document.append("行政法", 73);
document.append("刑法", 69);
scoreDao.insertScore(document);
document = new Document();
document.append("姓名", "王力");
document.append("院系", "外语系");
document.append("英语", 99);
document.append("马克思主义", 86);
scoreDao.insertScore(document);
document = new Document();
document.append("姓名", "赵正");
document.append("院系", "电子系");
document.append("英语", 99);
document.append("数字电子技术", 93);
document.append("模拟电子技术", 96);
document.append("大学物理", 88);
scoreDao.insertScore(document);
}
public List<Document> getAll(){
return scoreDao.getAll();
}
}
从代码中可以看到,我们保存的每条数据的字段列表都不同,而且字段名可以是中文!
8、在controller包中增加ScoreController类,用于接收来自前端的命令:
package com.flying.score.controller;
import com.flying.score.biz.ScoreBiz;
import org.bson.Document;
import org.springframework.beans.factory.annotation.Autowired;
import org.springframework.web.bind.annotation.GetMapping;
import org.springframework.web.bind.annotation.RestController;
import java.util.List;
@RestController
public class ScoreController {
@Autowired
private ScoreBiz scoreBiz;
@GetMapping("/insert")
private String insert(){
scoreBiz.insertScores();
return "successfully";
}
@GetMapping("/getAll")
private List<Document> getAll(){
return scoreBiz.getAll();
}
}
特别说明一下,insert操作正常的方式应该是通过POST请求发起,为了便于通过浏览器测试,这里变为GET请求发起。
9、修改application.properties文件,配置程序的监听端口为8987,并且设置好连接MongoDB的配置信息:
server.port=8987
spring.data.mongodb.authentication-database=db_student
spring.data.mongodb.database=db_student
spring.data.mongodb.host=127.0.0.1
spring.data.mongodb.port=27017
spring.data.mongodb.username=admin
spring.data.mongodb.password=112233
10、修改pom.xml文件,增加编译和打包的信息,完整的pom.xml文件的内容如下:
<?xml version="1.0" encoding="UTF-8"?>
<project xmlns="http://maven.apache.org/POM/4.0.0" xmlns:xsi="http://www.w3.org/2001/XMLSchema-instance"
xsi:schemaLocation="http://maven.apache.org/POM/4.0.0 https://maven.apache.org/xsd/maven-4.0.0.xsd">
<modelVersion>4.0.0</modelVersion>
<parent>
<groupId>org.springframework.boot</groupId>
<artifactId>spring-boot-starter-parent</artifactId>
<version>2.3.4.RELEASE</version>
<relativePath/> <!-- lookup parent from repository -->
</parent>
<groupId>com.flying</groupId>
<artifactId>score</artifactId>
<version>1.0.1</version>
<name>score</name>
<description>Score project for Spring Boot</description>
<properties>
<java.version>1.8</java.version>
</properties>
<dependencies>
<dependency>
<groupId>org.springframework.boot</groupId>
<artifactId>spring-boot-starter-data-mongodb</artifactId>
</dependency>
<dependency>
<groupId>org.springframework.boot</groupId>
<artifactId>spring-boot-starter-web</artifactId>
</dependency>
<dependency>
<groupId>org.projectlombok</groupId>
<artifactId>lombok</artifactId>
<optional>true</optional>
</dependency>
<dependency>
<groupId>org.springframework.boot</groupId>
<artifactId>spring-boot-starter-test</artifactId>
<scope>test</scope>
<exclusions>
<exclusion>
<groupId>org.junit.vintage</groupId>
<artifactId>junit-vintage-engine</artifactId>
</exclusion>
</exclusions>
</dependency>
<!-- https://mvnrepository.com/artifact/org.json/json -->
<dependency>
<groupId>org.json</groupId>
<artifactId>json</artifactId>
<version>20180813</version>
</dependency>
</dependencies>
<build>
<finalName>score</finalName>
<plugins>
<!--打包jar-->
<plugin>
<groupId>org.apache.maven.plugins</groupId>
<artifactId>maven-jar-plugin</artifactId>
<configuration>
<!--不打包资源文件,exclude的目录不是src下面的,是以编译结果classes为根目录计算-->
<excludes>
<exclude>*.properties</exclude>
<exclude>*.txt</exclude>
<exclude>*.xml</exclude>
</excludes>
<archive>
<manifest>
<addClasspath>true</addClasspath>
<!--MANIFEST.MF 中 Class-Path 加入前缀-->
<classpathPrefix>score_lib/</classpathPrefix>
<!--jar包不包含唯一版本标识-->
<useUniqueVersions>false</useUniqueVersions>
<!--指定入口类-->
<mainClass>com.flying.score.ScoreApplication</mainClass>
</manifest>
<manifestEntries>
<!--MANIFEST.MF 中 Class-Path 加入资源文件目录-->
<Class-Path>./resources/</Class-Path>
</manifestEntries>
</archive>
<outputDirectory>${project.build.directory}</outputDirectory>
</configuration>
</plugin>
<!--拷贝依赖 copy-dependencies-->
<plugin>
<groupId>org.apache.maven.plugins</groupId>
<artifactId>maven-dependency-plugin</artifactId>
<executions>
<execution>
<id>copy-dependencies</id>
<phase>package</phase>
<goals>
<goal>copy-dependencies</goal>
</goals>
<configuration>
<outputDirectory>
${project.build.directory}/score_lib/
</outputDirectory>
</configuration>
</execution>
</executions>
</plugin>
<!--拷贝资源文件 copy-resources-->
<plugin>
<artifactId>maven-resources-plugin</artifactId>
<executions>
<execution>
<id>copy-resources</id>
<phase>package</phase>
<goals>
<goal>copy-resources</goal>
</goals>
<configuration>
<resources>
<resource>
<directory>src/main/resources</directory>
</resource>
</resources>
<outputDirectory>${project.build.directory}/resources</outputDirectory>
</configuration>
</execution>
</executions>
</plugin>
</plugins>
</build>
</project>
11、在IDEA的Terminal窗口执行mvn clean package -DskipTests命令,实现软件的编译和打包:


12、编译完成后,可以发现生成target目录,并且该目录下有我们需要的resources目录、score_lib目录和score.jar文件:

13、将生成的resources目录、score_lib目录和score.jar文件拷贝到目标操作系统(我比较喜爱Linux,使用的是Ubuntu Server操作系统):

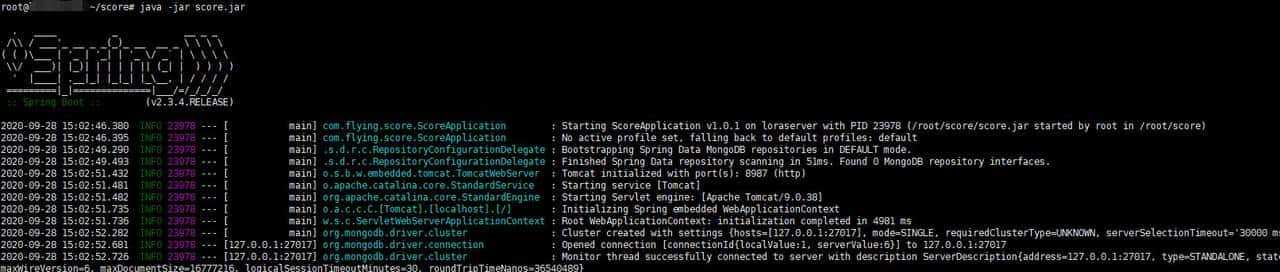
14、登录Linux,进入到刚刚文件拷贝到目录,然后执行java -jar score.jar命令,启动我们生成的程序:
15、打开浏览器,在地址栏输入http://192.168.101.223:8987/insert,发现浏览器会显示successfully信息:

16、这时,我们在MongoDB命令行下,查询col_score集合,可以发现4位学生的成绩已经存入数据库:
> db.col_score.find().pretty()
{
"_id" : ObjectId("5f7193fe89d5e031a590abf1"),
"姓名" : "张文",
"院系" : "中文系",
"英语" : 92,
"古汉语" : 88
}
{
"_id" : ObjectId("5f7193ff89d5e031a590abf2"),
"姓名" : "李静",
"院系" : "法律系",
"英语" : 62,
"行政法" : 73,
"刑法" : 69
}
{
"_id" : ObjectId("5f7193ff89d5e031a590abf3"),
"姓名" : "王力",
"院系" : "外语系",
"英语" : 99,
"马克思主义" : 86
}
{
"_id" : ObjectId("5f7193ff89d5e031a590abf4"),
"姓名" : "赵正",
"院系" : "电子系",
"英语" : 99,
"数字电子技术" : 93,
"模拟电子技术" : 96,
"大学物理" : 88
}
17、在地址栏输入http://192.168.101.223:8987/getAll,发现浏览器会显示所有学生的成绩信息:

说明:我们没有特别进行前端开发,因此浏览器只能简单显示收到的数据信息,看起来很杂乱。
目前,已经讲到了NoSQL数据库通过SpringBoot进行操作的主题了,后面将会继续讲解其它有意思的主题。
© 版权声明
文章版权归作者所有,未经允许请勿转载。
相关文章


暂无评论...


![[理论篇-10]AI 工作流(AI Workflow)—— 让 AI 像流水线一样干活](https://www.dunling.com/img/1.jpg)