
简介:
MyBatis-Plus (opens new window)(简称 MP)是一个 MyBatis (opens new window) 的增强工具,在 MyBatis 的基础上只做增强不做改变,为简化开发、提高效率而生。

快速入门
地址:https://mp.baomidou.com/guide/quick-start.html
使用第三方组件:
导入对应依赖研究依赖如何配置代码如何编写提高扩展技术能力!
步骤:
创建数据库mybatis-plus创建user表,并添加相关字段
DROP TABLE IF EXISTS user;
CREATE TABLE user
(
	id BIGINT(20) NOT NULL COMMENT '主键ID',
	name VARCHAR(30) NULL DEFAULT NULL COMMENT '姓名',
	age INT(11) NULL DEFAULT NULL COMMENT '年龄',
	email VARCHAR(50) NULL DEFAULT NULL COMMENT '邮箱',
	PRIMARY KEY (id)
);
-- 真实开发中,version(乐观锁),deleted(逻辑删除)、gmt_create、gmt_modified
INSERT INTO user (id, name, age, email) VALUES
(1, 'Jone', 18, 'test1@baomidou.com'),
(2, 'Jack', 20, 'test2@baomidou.com'),
(3, 'Tom', 28, 'test3@baomidou.com'),
(4, 'Sandy', 21, 'test4@baomidou.com'),
(5, 'Billie', 24, 'test5@baomidou.com');
编写项目!初始化项目!使用SpringBoot初始化!导入依赖
       <!--mybatis-plus
        很明显是自己开发的,并非是官方的-->
        <dependency>
            <groupId>com.baomidou</groupId>
            <artifactId>mybatis-plus-boot-starter</artifactId>
            <version>3.0.5</version>
        </dependency>
        <!--偷懒神器-->
        <dependency>
            <groupId>org.projectlombok</groupId>
            <artifactId>lombok</artifactId>
        </dependency>
        <!--数据库驱动-->
        <dependency>
            <groupId>mysql</groupId>
            <artifactId>mysql-connector-java</artifactId>
        </dependency>
        <dependency>
            <groupId>org.springframework.boot</groupId>
            <artifactId>spring-boot-starter</artifactId>
        </dependency>
说明:我们使用mybatis-plus,可以节省我们大量的代码,尽量不用同时导入mybatis和mybatis-plus!可能会出现版本差异,出现问题
连接数据库!这一步和mybatis相同
#mysql 5 驱动不同与mysql8,mysql8要配置时区,且驱动不同
# spring.datasource.driver-class-name=com.mysql.jdbc.Driver ,高版本的数据驱动兼容低版本 ,时区配置可以选择你想要的,UTCGMT
spring.datasource.username=root
spring.datasource.password=123
spring.datasource.url=jdbc:mysql://localhost:3306/mybatis_plus?useSSL=true&serverTimezone=UTC&useUnicode=true&characterEncoding=utf-8
spring.datasource.driver-class-name=com.mysql.cj.jdbc.Driver
6. 传统方式:pojo-dao(连接mybatis,配置mapperxml文件)-service-controller
6. 使用mybatisPlus之后:
pojo
@Data
@AllArgsConstructor
@NoArgsConstructor
public class User {
    private  Long id;
    private  String name;
    private Integer age;
    private String email;
}
Mapper 接口
@Repository
@Mapper
public interface UserMapper extends BaseMapper<User> {
    //所有的CRUD操作都已经编写完成了
    //不需要再像以前的配置一大堆文件了
}
注意点,要么增加一个@Mapper注解,标注它为一个Mapper文件,要么在主启动类上,@ScannerMapper(“com.XXX.mapper”)扫描使用
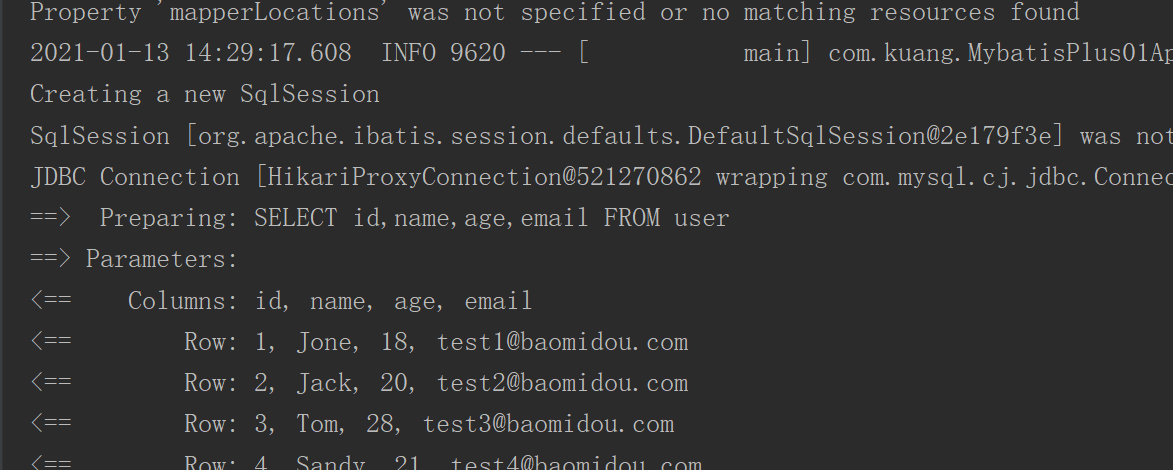
@SpringBootTest
class MybatisPlus01ApplicationTests {
    @Autowired
    //继承了BaseMapper,所有的方法都来自 自己的父类,我们也可以编写自己的扩展方法!
    private UserMapper userMapper;
    @Test
    void contextLoads() {
        //参数是一个wapper,条件构造器,我们先不用
        List<User> userList = userMapper.selectList(null);
        userList.forEach(System.out::println);

    }
}
思考问题
1.SQL谁帮我们写的? MybatisPlus
2.方法哪里来的? MybatisPlus
配置日志
#配置日志,使用默认的控制台输出
mybatis-plus.configuration.log-impl=org.apache.ibatis.logging.stdout.StdOutImpl
CRUD扩展
插入操作
    @Test
    public void testInsert(){
        User user = new User(null,"飞雨凌落",3,"224712146@qq.com");

        int insert = userMapper.insert(user);//帮我们自动生成id
        System.out.println(insert);//受影响的行数
        System.out.println(user);//发现,id会自动回填
    }
主键生成策略
1. 主键全局唯一id
默认
ID_WORKER
分布式系统唯一id:https://www.cnblogs.com/haoxinyue/p/5208136.html
雪花算法:
snowflake是Twitter开源的分布式ID生成算法,结果是一个long型的ID。其核心思想是:使用41bit作为毫秒数,10bit作为机器的ID(5个bit是数据中心,5个bit的机器ID),12bit作为毫秒内的流水号(意味着每个节点在每毫秒可以产生 4096 个 ID),最后还有一个符号位,永远是0。具体实现的代码可以参看https://github.com/twitter/snowflake。几乎可以保证全球唯一
2.主键自增策略
我们需要配置主键自增:
在实体类上
@TableId(type = IdType.AUTO)
 再次测试直接插入即可
3.其余策略
 /**
     * 数据库ID自增
     */
    AUTO(0),
    /**
     * 该类型为未设置主键类型
     */
    NONE(1),
    /**
     * 用户输入ID
     * 该类型可以通过自己注册自动填充插件进行填充
     */
    INPUT(2),

    /* 以下3种类型、只有当插入对象ID 为空,才自动填充。 */
    /**
     * 全局唯一ID (idWorker)
     */
    ID_WORKER(3),
    /**
     * 全局唯一ID (UUID)
     */
    UUID(4),
    /**
     * 字符串全局唯一ID (idWorker 的字符串表示)
     */
    ID_WORKER_STR(5);
更新操作
    /**
     *测试更新
    */
    @Test
    public void update(){
        //通过条件自动拼接sql,
        // update当对象属性为null值无法通过mybatisPlus将数据库中值置为null
        User user = new User(5L,"凌落",null,"224716@qq.com");
        //注意:虽然名字是ById,但是参数是一个对象
        int i = userMapper.updateById(user);
        System.out.println(i);
    }

自动填充
创建时间、修改时间!这些操作都是自动化完成的,我们不希望手动更新!
阿里巴巴开发手册:所有数据库表:gmt_create、gmt_modified几乎所有的表都要配置上!而且需要自动化!
方式一:数据库级别(工作中不允许你修改数据库的)
在表中新增字段:ctime、utime
 再次测试方法,我们需要先把实体类同步
	private Date ctime;
    private Date utime;

方式二:代码级别
删除数据库的默认值、更新的操作!
 实体类字段属性上,需要增加注解了
    /**
     *字段添加,填充内容
    */
    @TableField(fill = FieldFill.INSERT)
    private Date ctime;
    @TableField(fill = FieldFill.INSERT_UPDATE)
    private Date utime;
编写处理器
@Slf4j
@Component //一定不要忘记把处理器加到容器中
public class MymetaObjectHandler implements MetaObjectHandler {
    /**
     *插入时候的填充策略
    */
    @Override
    public void insertFill(MetaObject metaObject) {
        log.info("start insert fill......");
        //当前类对象
        //setFieldValByName(String fieldName, Object fieldVal, MetaObject metaObject)
        this.setFieldValByName("ctime",new Date(),metaObject);
        this.setFieldValByName("utime",new Date(),metaObject);

    }
    /**
     *更新时的填充策略
    */
    @Override
    public void updateFill(MetaObject metaObject) {
        log.info("start update fill......");
        this.setFieldValByName("utime",new Date(),metaObject);
    }
}
测试插入测试更新
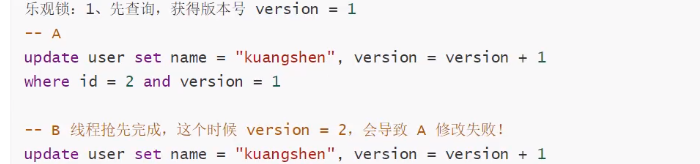
乐观锁
简介:
在面试过程中,我们经常会被问道乐观锁,悲观锁。
乐观锁
顾名思义:十分的乐观,它总时认为不会出现问题,无论干什么都不去上锁!
如果出现了问题,再次更新值测试
悲观锁
顾名思义:十分悲观,它认为总是会出现问题,无论干什么都会先将锁加上!再取操作
乐观锁实现方式
当要更新一条记录的时候,希望这条记录没有被别人更新
乐观锁实现方式:
取出记录时,获取当前version更新时,带上这个version执行更新时, set version = newVersion where version = oldVersion如果version不对,就更新失败
测试一下MybatisPlus乐观锁插件
给数据库中添加version字段给实体类添加属性和注释
@Version
    private int version;
注册组件
@EnableTransactionManagement//自动默认是开启的管理事务
//一般扫描的我们的mapper文件是交给mybatis配置类,但是使用了@Mapper注解后,可以不需要扫描注解
@Configuration//配置类
public class MybatisPlusConfig {
    //注册乐观锁插件
    @Bean
    public OptimisticLockerInterceptor optimisticLockerInterceptor(){
        return new OptimisticLockerInterceptor();
    }
}
测试一下
    //测试乐观锁成功!
    @Test
    public void testSuccess(){
        //1.查询用户信息
        User user = userMapper.selectById(1L);
        //2.修改用户信息
        user.setName("飞a雨凌落");
        user.setAge(666);
        //3.执行更新操作
        int i = userMapper.updateById(user);
        System.out.println(i);
    }
    @Test
    //测试乐观锁失败!多线程情况下
    public void testFail(){
        //线程一
        User user = userMapper.selectById(1L);
        user.setName("凌落");
        user.setAge(666);
        //模拟另一个线程2,执行了插队操作
        User user2 = userMapper.selectById(1L);
        user2.setName("凌落222");
        user2.setAge(666);
        userMapper.updateById(user2);
        //执行了‘线程2’
        //可以使用自旋锁多次尝试GUC线程并发中讲过
        userMapper.updateById(user);//如果没有乐观锁就会覆盖插队线程的值
    }
查询
/**
     *测试批量查询
    */
    @Test
    public void testSelectBatchId(){
        //测试查询多个用户,数组转集合
        List<User> userList = userMapper.selectBatchIds(Arrays.asList(1, 2, 3));
        userList.forEach(System.out::println);

    }
    /**
     *按条件查询之一 map
    */
    @Test
    public void testSelectBatch(){
        HashMap<String, Object> map = new HashMap<>();
        //自定义要查询的(多 )条件
        map.put("name","凌落");
        map.put("age","33");
        List<User> userList = userMapper.selectByMap(map);
        userList.forEach(System.out::println);
    }
分页查询
原始的limit进行分页插件pageHelper第三方插件MP也内置了分页插件
如何使用
配置拦截器组件即可
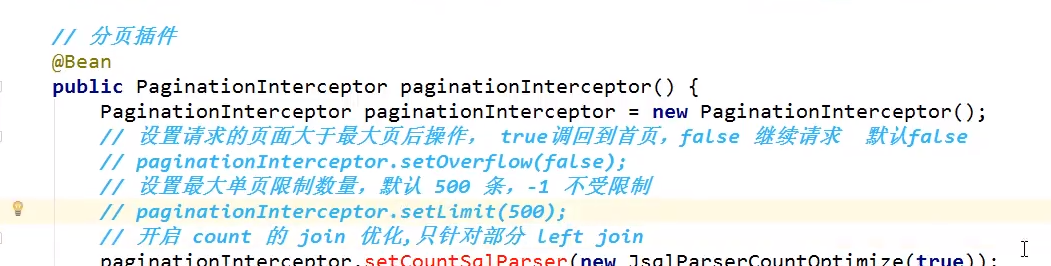
  /**
     *配置分页插件
    */
    public PaginationInterceptor paginationInterceptor(){
        return new PaginationInterceptor();
    }
直接使用分页插件即可
/**
     *配置分页插件
    */
    @Bean
    public PaginationInterceptor paginationInterceptor(){
        return new PaginationInterceptor();
    }
测试
/**
     *测试分页查询
    */
    @Test
    public void testPage(){
        //如果分页插件没有注入到bean中,则会直接查询出所有数据
        Page<User> userPage = new Page<>(1,5);
        userMapper.selectPage(userPage,null);
        userPage.getRecords().forEach(System.out::println);
        long total = userPage.getTotal();
        System.out.println(total);
    }
删除操作
直接代码展示
    /**
     *测试删除,(批量)通过id,
     */
    @Test
    public void testDel(){
        /*//删除单个
        userMapper.deleteById(1L);
        //删除多个测试都不想测试
        userMapper.deleteBatchIds(Arrays.asList(1L,2));*/
        //通过Map多个条件删除
        HashMap<String, Object> map = new HashMap<>();
        map.put("name","凌落");
        map.put("age","33");
        userMapper.deleteByMap(map);
    }
*逻辑删除
数据库增加字段
 实体类上增加属性和注解
@TableLogic//逻辑删除注解
    private int deleted;
配置
/**
     *逻辑删除,LogicSqlInjector逻辑删除组件
    */
    @Bean
    public ISqlInjector iSqlInjector(){
        return new LogicSqlInjector();
    }
在properties中配置
#配置日志,使用默认的控制台输出
mybatis-plus.configuration.log-impl=org.apache.ibatis.logging.stdout.StdOutImpl
# 配置逻辑删除
mybatis-plus.global-config.db-config.logic-delete-value=1
mybatis-plus.global-config.db-config.logic-not-delete-value=0
测试一下删除
/**
     *逻辑删除
    */
    @Test
    public void testLoginDel(){
        int i = userMapper.deleteById(1L);
        System.out.println(i);
    }
这里执行的是更新操作


执行查询

性能分析工具
我们平时开发中会遇到一些慢SQL。
Mybatis也提供性能分析插件,如果超过这个时间就停止运行
导入插件
    /**
     *SQL执行效率插件
    */
    @Bean
    @Profile({"dev","test"})
    public PerformanceInterceptor performanceInterceptor(){
        PerformanceInterceptor interceptor = new PerformanceInterceptor();
        //设置sql执行的最大时间,如果超过了就不会执行
        //SQL语句超过1秒不执行
        interceptor.setMaxTime(1000);
        //SQL 是否格式化,默认为false
        interceptor.setFormat(true);
        return interceptor;
    }
注意,在spring中配置环境
# 配置开发环境,
spring.profiles.active=dev
测试,只要超过规定的时间就会抛出异常

使用性能分析插件,可以提高我们的效率!
条件构造器

测试1:多条件查询
   /**
     *查询name不为空的用户,并且邮箱不为空的参数,年龄大于等于12
     */
    @Test
    void contextloads(){
        QueryWrapper<User> wrapper = new QueryWrapper<>();
        wrapper
                .isNotNull("name")
                .isNotNull("email")
                .ge("age",12); //g=greater than e = equal
        userMapper.selectList(wrapper).forEach(System.out::println);
    }
测试二:单个查询查询名字
进行了selectOne和selectById以及selectByMap三者查询执行时间的对比。
 @Test
    void test2(){
        //查询名字  凌落
        QueryWrapper<User> wrapper = new QueryWrapper<>();
        wrapper.eq("name","凌落");//查询一个数据,使用这个,如果有多个数据则会出现异常,这里最好查询的是名字唯一

        userMapper.selectOne(wrapper);//60ms
        userMapper.selectById(8L);
        //对比操作,一个一个查询,并执行maven-clean,通过关键字(151ms)查询selectOne(60ms)

        HashMap<String, Object> hashMap = new HashMap<>();
        hashMap.put("name","凌落");
        userMapper.selectByMap(hashMap);//75ms
    }
测试三:范围查询
@Test
    void test3(){
        //年龄在20-30岁之间的用户
        QueryWrapper<User> wrapper = new QueryWrapper<>();
        wrapper.between("age",20,30);//这个范围是[20,30],两边开区间
        List<User> userList = userMapper.selectList(wrapper);
        userList.forEach(System.out::println);
        Integer count = userMapper.selectCount(wrapper);//;
        System.out.println("查询的结果一共有:"+count);
    }
测试四:模糊查询
/**
     *模糊查询
    */
    @Test
    void test4(){
        QueryWrapper<User> wrapper = new QueryWrapper<>();
        //左和右   %e   e%   模糊的在左边,模糊的在右边
        wrapper
                .notLike("name","2")            //不包含
//                .likeRight("name","落");知道落%,
                .likeRight("email","t");
        List<Map<String, Object>> mapList = userMapper.selectMaps(wrapper);
        mapList.forEach(System.out::println);
    }
测试五:嵌套查询
想看嵌套语句,然后进行运行出了异常。
Failed to configure a DataSource: 'url' attribute is not specified and no embedded datasource could be configured.
Failed to determine a suitable driver class
Error creating bean with name 'dataSource' defined in class path resource
配置数据源失败:未指定“url”属性,无法配置嵌入的数据源。
未能确定合适的驱动程序类别
Error creating bean with name ‘dataSource’ defined in class path resource 百度了这个语句,在在启动项加上@EnableAutoConfiguration(exclude={DataSourceAutoConfiguration.class}),无果。然后自己觉得可能是pom文件中数据库驱动导包出现问题,删掉了mysql-connector-java,后运行成功再次把mysql-connector-java驱动添加回来,运行成功。实际 没弄懂到底发生了什么。
/**
     *嵌套查询
    */
    @Test
    void test5(){
        QueryWrapper<User> wrapper = new QueryWrapper<>();
        //id在子查询中查找出来
        wrapper.inSql("id","select id from user  where id<3 ");
        List<Object> objects = userMapper.selectObjs(wrapper);
        objects.forEach(System.out::println);
    }
Execute SQL:
    SELECT  id, name,age,email,version, deleted,ctime,utime
    FROM user  WHERE deleted=0 AND
    id IN (
            select
                id
            from
                user
            where
                id<3
        )
测试六:分组查询
/**
     *分组查询
    */
    @Test
    void test6(){
        QueryWrapper<User> wrapper = new QueryWrapper<>();
        //通过Id排序  Desc降序排序
        wrapper.orderByDesc("id");
//        wrapper.orderByAsc("id");升序排序
        List<Object> objects = userMapper.selectObjs(wrapper);
        objects.forEach(System.out::println);
        //对比了一下两个的实际区别没看出来。
        List<User> userList = userMapper.selectList(wrapper);
        userList.forEach(System.out::println);
    }
问题描述:
后台挂了一个DNF卡了,占了内存,导致内存不足,Java运行时环境无法继续。
Unable to allocate 97344KB bitmaps for parallel garbage collection for the requested 3115008KB heap.
Compiler replay data is saved as:
An error report file with more information is saved as:
There is insufficient memory for the Java Runtime Environment to continue.
# Native memory allocation (malloc) failed to allocate 1264976 bytes for Chunk::new
数据库中自动创建的时间戳添加进数据库中后时间不一致


代码级别自动插入时间与数据库时间不一致情况
百度原因是:UTC是全球时间,数据库默认使用中国时间,比UTC早8个小时


© 版权声明
文章版权归作者所有,未经允许请勿转载。
相关文章


暂无评论...