swagger-ui升级版swagger-bootstrap-ui
一、概述
Swagger是一个规范、完整的框架,用于生成、描述、调用和可视化Restful风格的Web服务。使用Swagger可以使前端和后端人员实时的进行接口查看和协调。也可对相关的接口进行测试。
二、集成Swagger
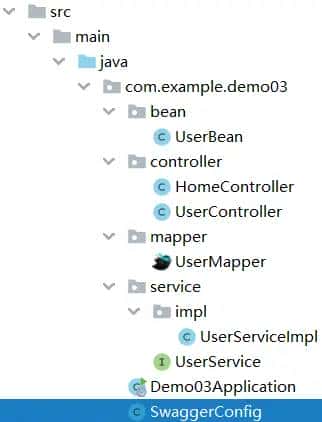
1、创建基于Maven的项目,结构目录如下
2、添加swagger的pom.xml依赖
<!--Swagger2-->
<!--Swagger-UI-->
<!--访问路径:http://localhost:8080/swagger-ui.html-->
<dependency>
    <groupId>io.springfox</groupId>
    <artifactId>springfox-swagger2</artifactId>
    <version>2.9.2</version>
</dependency>
<dependency>
    <groupId>io.springfox</groupId>
    <artifactId>springfox-swagger-ui</artifactId>
    <version>2.9.2</version>
</dependency>

<!--swaggerui  几个自定义界面方便查看接口-->
<!--访问路径:http://localhost:8080/doc.html-->
<dependency>
    <groupId>com.github.xiaoymin</groupId>
    <artifactId>swagger-bootstrap-ui</artifactId>
    <version>1.9.6</version>
</dependency>
<!-- # 增加两个配置解决 NumberFormatException -->
<dependency>
    <groupId>io.swagger</groupId>
    <artifactId>swagger-annotations</artifactId>
    <version>1.5.22</version>
</dependency>
<dependency>
    <groupId>io.swagger</groupId>
    <artifactId>swagger-models</artifactId>
    <version>1.5.22</version>
</dependency>
3、新建Swagger配置类:SwaggerConfig
package com.example.demo03;

import com.github.xiaoymin.swaggerbootstrapui.annotations.EnableSwaggerBootstrapUI;
import org.springframework.context.annotation.Bean;
import org.springframework.context.annotation.Configuration;
import springfox.documentation.builders.ApiInfoBuilder;
import springfox.documentation.builders.PathSelectors;
import springfox.documentation.builders.RequestHandlerSelectors;
import springfox.documentation.service.ApiInfo;
import springfox.documentation.service.Contact;
import springfox.documentation.spi.DocumentationType;
import springfox.documentation.spring.web.plugins.Docket;
import springfox.documentation.swagger2.annotations.EnableSwagger2;

@Configuration
@EnableSwagger2//开启Swagger
@EnableSwaggerBootstrapUI
public class SwaggerConfig {

    //  http://localhost:8080/swagger-ui.html 原路径
    //  http://localhost:8080/doc.html 原路径
    //配置swagger2核心配置
    @Bean
    public Docket createRestApi(){
        return new Docket(DocumentationType.SWAGGER_2) //指定api类型位swagger2
                .apiInfo(apiInfo())            //用于定义api文档汇总信息
                .select().apis(RequestHandlerSelectors
                        .basePackage("com.example.demo03.controller")) //指定生成文档的controller
                .paths(PathSelectors.any())
                .build();
    }

    private ApiInfo apiInfo(){
        return new ApiInfoBuilder()
                .title("潮装网的项目接口api") //文档标题
                .contact(new Contact("xuanzhangran", //作者
                        "www.diqifanshi.com","1107160410@qq.com")) //联系人
                .description("xuanzhangran 的项目api接口")//详细信息
                .version("1.0.0")//文档版本号
                .termsOfServiceUrl("www.diqifanshi.com")//网站地址
                .build();
    }
}
4、新建用户实体类:User
package com.example.demo03.bean;

import io.swagger.annotations.ApiModel;
import io.swagger.annotations.ApiModelProperty;

@ApiModel("用户实体类")
public class UserBean {
    @ApiModelProperty("id")
    private int id;
    @ApiModelProperty("用户名")
    private String name;
    @ApiModelProperty("年龄")
    private int age;
    @ApiModelProperty("密码")
    private String password;

    public int getId() {
        return id;
    }

    public void setId(int id) {
        this.id = id;
    }

    public String getName() {
        return name;
    }

    public void setName(String name) {
        this.name = name;
    }

    public int getAge() {
        return age;
    }

    public void setAge(int age) {
        this.age = age;
    }

    public String getPassword() {
        return password;
    }

    public void setPassword(String password) {
        this.password = password;
    }

    @Override
    public String toString() {
        return "UserBean{" +
                "id=" + id +
                ", name= " + name +     +
                ", age=" + age +
                ", password= " + password +     +
                 } ;
    }
}
5、新建用户操作控制器:UserController
package com.example.demo03.controller;

import com.example.demo03.bean.UserBean;
import com.example.demo03.service.UserService;
import io.swagger.annotations.Api;
import io.swagger.annotations.ApiOperation;
import org.slf4j.Logger;
import org.slf4j.LoggerFactory;
import org.springframework.beans.factory.annotation.Autowired;
import org.springframework.web.bind.annotation.*;

import java.util.List;

@Api(tags = "用户操作模块API")//作用在模块API类上,对API模块进行说明
@RestController
@RequestMapping("/user")
public class UserController {

    private static Logger logger = LoggerFactory.getLogger(UserController.class);

    @Autowired
    UserService userService;

    @ApiOperation("根据ID查询用户")
    @GetMapping("/user/{id}")
    public UserBean getUserById(@PathVariable("id") int id){
        return userService.getUserById(id);
    }

    @GetMapping("/user")
    public UserBean getUserByParams(@RequestParam("id") int id){
        return userService.getUserById(id);
    }

    @GetMapping("/userAll")
    public List<UserBean> getUserAll(){
        return userService.getUserAll();
    }

    @GetMapping("/test/{age}")
    public void getUserByAge(@PathVariable(value = "age") int age){
        logger.info(age + "");
    }

    @ApiOperation("添加用户接口")//作用在API方法上,对操作进行说明
    @PostMapping("/add")
    public String addUserByParams(@RequestBody UserBean userBean){
        return "添加成功";
    }

    @PostMapping("/update")
    public String updateUserByParams(@RequestBody UserBean userBean){
        return "更新成功";
    }

    @RequestMapping(value = "/login",method = RequestMethod.GET)
    public String login(String name,String password){
        logger.info(name + ": " + password);
        UserBean userBean = userService.loginIn(name,password);
        if(userBean!=null){
            return "success";
        }else {
            return "error";
        }
    }
}
6、常见注解简介
@Api:修饰整个类,描述Controller的作用
 @ApiOperation:描述一个类的一个方法,或者说一个接口
 @ApiParam:单个参数描述
 @ApiModel:用对象实体来作为入参
 @ApiProperty:用对象接实体收参数时,描述对象的一个字段
 @ApiResponse:HTTP响应其中1个描述
 @ApiResponses:HTTP响应整体描述
 @ApiIgnore:使用该注解忽略这个API
 @ApiError :发生错误返回的信息
 @ApiImplicitParam:一个请求参数
 @ApiImplicitParams: 多个请求参数
7、演示(为方便我使用了上面第一种配置)
原路径调试

doc模式访问
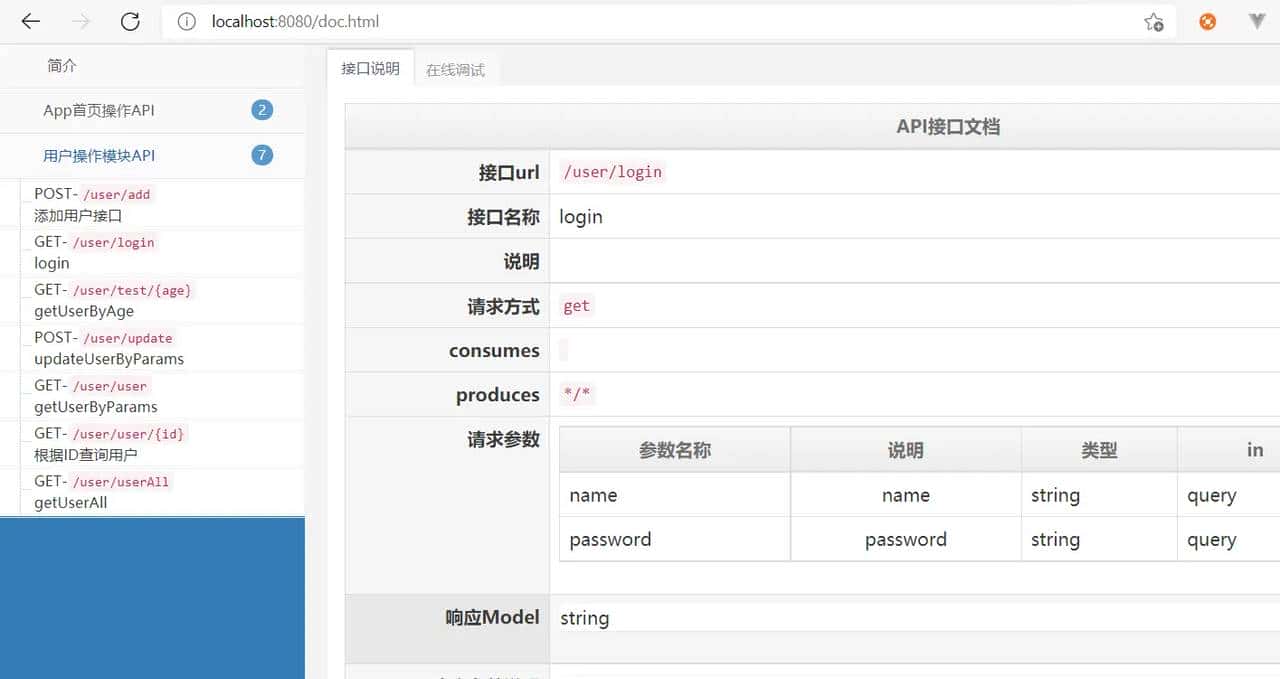
上述就是我为大家分享的如何在springboot项目中使用Swagger2了,如果刚好有类似的疑惑,不妨参照上述步骤进行操作。下面一篇我会介绍 swagger-bootsrap-ui的进阶版 knife4j ,也是目前最为流行的接口文档接入方式。
© 版权声明
文章版权归作者所有,未经允许请勿转载。
相关文章


暂无评论...


![[理论篇-10]AI 工作流(AI Workflow)—— 让 AI 像流水线一样干活](https://www.dunling.com/img/9.jpg)