
智能测试助手:基于LangChain的测试用例与报告自动化生成系统
在当今快速迭代的软件开发环境中,测试自动化已成为保证产品质量的关键环节。本文将详细介绍我们基于LangChain构建的智能测试助手web_agent,它能够自动生成测试用例并创建精美的测试报告,极大地提升了测试团队的工作效率。
一、web_agent架构设计
web_agent是一个基于LangChain框架的智能代理,它集成了多种工具来完成测试流程的自动化:
# 创建智能体
web_agent = create_agent(
    model=model,
    tools=get_mcp_server_chart_tools() + get_chrome_mcp_tools() + [export_test_cases_to_excel] + [generate_test_report_html],
    system_prompt="You are a helpful assistant"
)
核心组件分析
大语言模型集成:使用
model
图表生成工具:
get_mcp_server_chart_tools()
get_chrome_mcp_tools()
export_test_cases_to_excel
generate_test_report_html
二、核心功能实现
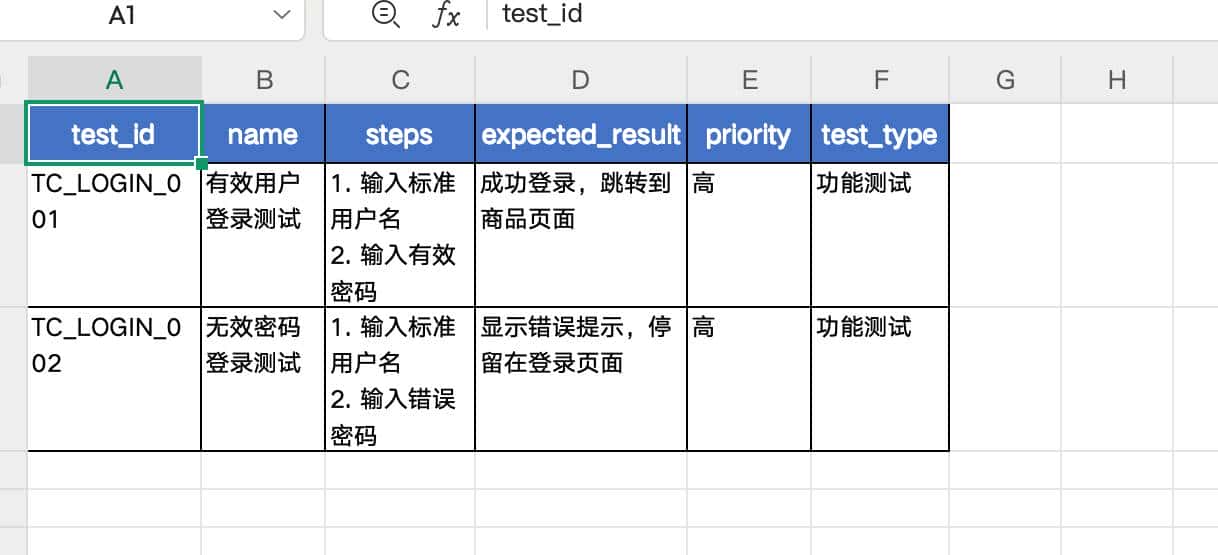
1. 测试用例Excel导出功能
export_test_cases_to_excel
#将测试用例导出为Excel格式并保存到本地指定路径
def export_test_cases_to_excel(
    test_cases: List[Dict[str, Any]],
    file_path: str,
    sheet_name: str = "测试用例",
    headers: Optional[List[str]] = None
) -> Dict[str, Any]:
    """
    将测试用例导出为Excel格式并保存到本地指定路径

    参数:
        test_cases: 测试用例列表,每个测试用例是一个字典
                   例如: [
                       {
                           "用例编号": "TC001",
                           "用例标题": "登录功能测试",
                           "前置条件": "用户已注册",
                           "测试步骤": "1. 打开登录页面
2. 输入用户名和密码
3. 点击登录按钮",
                           "预期结果": "成功登录并跳转到首页",
                           "优先级": "高",
                           "用例类型": "功能测试"
                       }
                   ]
        file_path: Excel文件保存路径,例如: "/Users/username/test_cases.xlsx"
        sheet_name: 工作表名称,默认为"测试用例"
        headers: 自定义表头列表,如果为None则使用test_cases中的键作为表头

    返回:
        包含操作结果的字典:
        {
            "success": True/False,
            "message": "操作结果信息",
            "file_path": "保存的文件路径",
            "rows_count": 保存的数据行数
        }
    """
    try:
        # 检查是否安装了openpyxl
        if openpyxl is None:
            return {
                "success": False,
                "message": "未安装openpyxl库,请运行: pip install openpyxl",
                "file_path": None,
                "rows_count": 0
            }

        # 检查测试用例是否为空
        if not test_cases:
            return {
                "success": False,
                "message": "测试用例列表为空",
                "file_path": None,
                "rows_count": 0
            }

        # 创建工作簿和工作表
        wb = openpyxl.Workbook()
        ws = wb.active
        ws.title = sheet_name

        # 确定表头
        if headers is None:
            headers = list(test_cases[0].keys())

        # 设置样式
        header_font = Font(name='微软雅黑', size=11, bold=True, color='FFFFFF')
        header_fill = PatternFill(start_color='4472C4', end_color='4472C4', fill_type='solid')
        header_alignment = Alignment(horizontal='center', vertical='center', wrap_text=True)

        cell_font = Font(name='微软雅黑', size=10)
        cell_alignment = Alignment(horizontal='left', vertical='top', wrap_text=True)

        border_side = Side(style='thin', color='000000')
        border = Border(left=border_side, right=border_side, top=border_side, bottom=border_side)

        # 写入表头
        for col_idx, header in enumerate(headers, start=1):
            cell = ws.cell(row=1, column=col_idx, value=header)
            cell.font = header_font
            cell.fill = header_fill
            cell.alignment = header_alignment
            cell.border = border

        # 写入数据
        for row_idx, test_case in enumerate(test_cases, start=2):
            for col_idx, header in enumerate(headers, start=1):
                value = test_case.get(header, "")
                # 处理列表类型的数据,转换为字符串格式
                if isinstance(value, list):
                    # 使用换行符连接列表中的每个元素
                    value = '
'.join(str(item) for item in value)
                # 处理字典类型的数据,转换为字符串格式
                elif isinstance(value, dict):
                    value = json.dumps(value, ensure_ascii=False)

                cell = ws.cell(row=row_idx, column=col_idx, value=value)
                cell.font = cell_font
                cell.alignment = cell_alignment
                cell.border = border
        # 自动调整列宽
        for col_idx, header in enumerate(headers, start=1):
            column_letter = get_column_letter(col_idx)
            # 根据表头长度和内容设置列宽
            max_length = len(str(header))
            for row_idx in range(2, len(test_cases) + 2):
                cell_value = ws.cell(row=row_idx, column=col_idx).value
                if cell_value:
                    # 考虑换行符,取最长的一行
                    lines = str(cell_value).split('
')
                    max_line_length = max(len(line) for line in lines) if lines else 0
                    max_length = max(max_length, max_line_length)

            # 设置列宽,最小10,最大50
            adjusted_width = min(max(max_length + 2, 10), 50)
            ws.column_dimensions[column_letter].width = adjusted_width

        # 设置行高
        ws.row_dimensions[1].height = 25  # 表头行高
        for row_idx in range(2, len(test_cases) + 2):
            ws.row_dimensions[row_idx].height = 60  # 数据行高

        # 确保目录存在
        directory = os.path.dirname(file_path)
        if directory and not os.path.exists(directory):
            os.makedirs(directory, exist_ok=True)

        # 保存文件
        wb.save(file_path)

        return {
            "success": True,
            "message": f"成功导出 {len(test_cases)} 条测试用例到 {file_path}",
            "file_path": file_path,
            "rows_count": len(test_cases)
        }

    except PermissionError:
        return {
            "success": False,
            "message": f"没有权限写入文件: {file_path},请检查文件是否被占用或路径权限",
            "file_path": file_path,
            "rows_count": 0
        }
    except Exception as e:
        return {
            "success": False,
            "message": f"导出失败: {str(e)}",
            "file_path": file_path,
            "rows_count": 0
        }.
技术亮点:
智能表头处理:自动提取测试用例字段作为表头,也支持自定义表头丰富的样式设置:使用
openpyxl
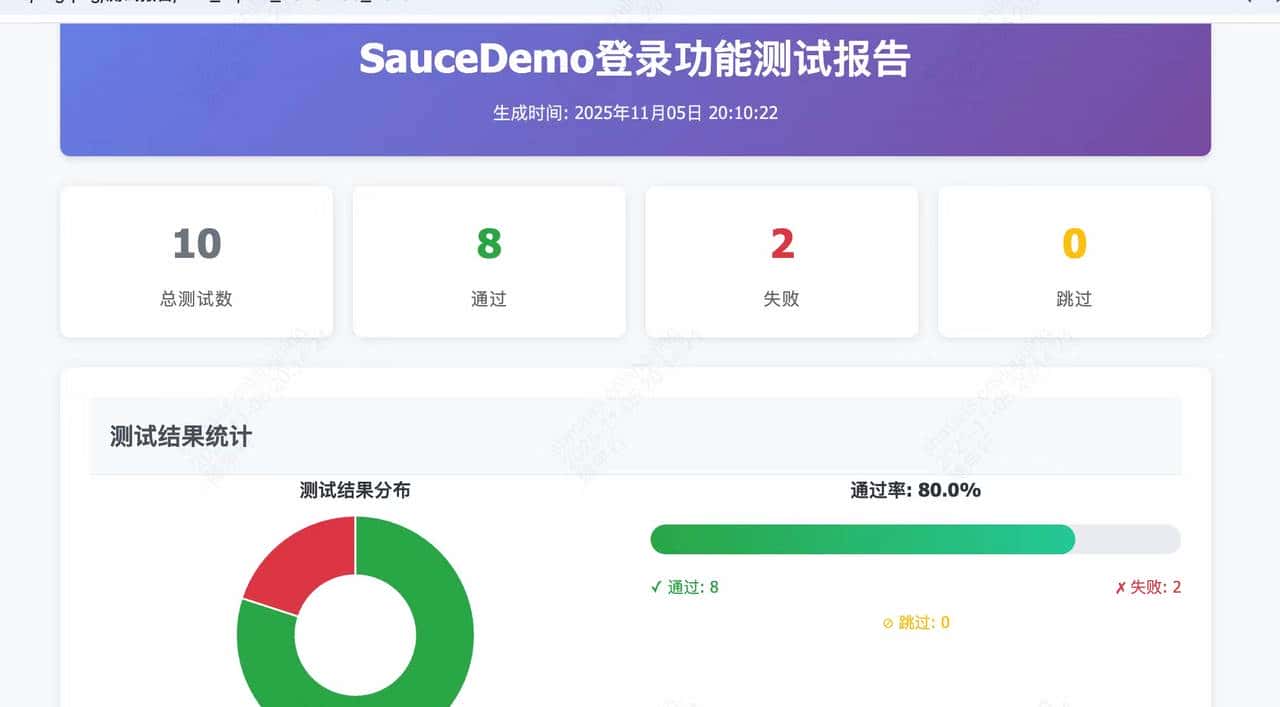
2. 可视化测试报告生成
generate_test_report_html
#生成图文并茂的测试报告HTML文件
def generate_test_report_html(
    report_data: Dict[str, Any],
    file_path: str,
    report_title: str = "测试报告",
    include_charts: bool = True
) -> Dict[str, Any]:
    """
    生成图文并茂的测试报告HTML文件

    参数:
        report_data: 测试报告数据字典,包含以下字段:
            {
                "summary": {  # 测试摘要
                    "total": 100,           # 总用例数
                    "passed": 85,           # 通过数
                    "failed": 10,           # 失败数
                    "skipped": 5,           # 跳过数
                    "pass_rate": 85.0,      # 通过率
                    "start_time": "2025-11-05 10:00:00",
                    "end_time": "2025-11-05 12:00:00",
                    "duration": "2小时",
                    "environment": "测试环境",
                    "tester": "测试人员"
                },
                "test_cases": [  # 测试用例详情列表
                    {
                        "id": "TC001",
                        "title": "用例标题",
                        "module": "模块名称",
                        "priority": "高",
                        "status": "通过",  # 通过/失败/跳过
                        "duration": "2s",
                        "error_message": "",  # 失败时的错误信息
                        "screenshot": "/path/to/screenshot.png"  # 可选:截图路径
                    }
                ],
                "module_stats": {  # 各模块统计(可选)
                    "登录模块": {"total": 10, "passed": 8, "failed": 2},
                    "注册模块": {"total": 15, "passed": 15, "failed": 0}
                },
                "custom_images": [  # 自定义图片(可选)
                    {
                        "title": "系统架构图",
                        "path": "/path/to/image.png",
                        "description": "图片描述"
                    }
                ]
            }
        file_path: HTML文件保存路径
        report_title: 报告标题
        include_charts: 是否包含图表,默认True

    返回:
        {
            "success": True/False,
            "message": "操作结果信息",
            "file_path": "保存的文件路径"
        }
    """
    try:
        # 提取数据
        summary = report_data.get("summary", {})
        test_cases = report_data.get("test_cases", [])
        module_stats = report_data.get("module_stats", {})
        custom_images = report_data.get("custom_images", [])

        # 生成图表(如果需要)
        charts_html = ""
        if include_charts and summary:
            charts_html = _generate_charts_html(summary, module_stats)

        # 生成测试用例详情HTML
        test_cases_html = _generate_test_cases_html(test_cases)

        # 生成自定义图片HTML
        custom_images_html = _generate_custom_images_html(custom_images)

        # 生成完整的HTML
        html_content = f"""<!DOCTYPE html>
<html lang="zh-CN">
<head>
    <meta charset="UTF-8">
    <meta name="viewport" content="width=device-width, initial-scale=1.0">
    <title>{report_title}</title>
    <style>
        * {{
            margin: 0;
            padding: 0;
            box-sizing: border-box;
        }}

        body {{
            font-family: 'Microsoft YaHei', 'SimHei', Arial, sans-serif;
            background: linear-gradient(135deg, #667eea 0%, #764ba2 100%);
            padding: 20px;
            line-height: 1.6;
        }}

        .container {{
            max-width: 1400px;
            margin: 0 auto;
            background: white;
            border-radius: 10px;
            box-shadow: 0 10px 40px rgba(0,0,0,0.2);
            overflow: hidden;
        }}

        .header {{
            background: linear-gradient(135deg, #667eea 0%, #764ba2 100%);
            color: white;
            padding: 40px;
            text-align: center;
        }}

        .header h1 {{
            font-size: 36px;
            margin-bottom: 10px;
            text-shadow: 2px 2px 4px rgba(0,0,0,0.3);
        }}

        .header .subtitle {{
            font-size: 16px;
            opacity: 0.9;
        }}

        .summary {{
            display: grid;
            grid-template-columns: repeat(auto-fit, minmax(200px, 1fr));
            gap: 20px;
            padding: 30px;
            background: #f8f9fa;
        }}

        .summary-card {{
            background: white;
            padding: 20px;
            border-radius: 8px;
            box-shadow: 0 2px 8px rgba(0,0,0,0.1);
            text-align: center;
            transition: transform 0.3s;
        }}

        .summary-card:hover {{
            transform: translateY(-5px);
            box-shadow: 0 4px 12px rgba(0,0,0,0.15);
        }}

        .summary-card .label {{
            font-size: 14px;
            color: #666;
            margin-bottom: 10px;
        }}

        .summary-card .value {{
            font-size: 32px;
            font-weight: bold;
            color: #333;
        }}

        .summary-card.total .value {{ color: #667eea; }}
        .summary-card.passed .value {{ color: #28a745; }}
        .summary-card.failed .value {{ color: #dc3545; }}
        .summary-card.skipped .value {{ color: #ffc107; }}
        .summary-card.pass-rate .value {{ color: #17a2b8; }}

        .section {{
            padding: 30px;
        }}

        .section-title {{
            font-size: 24px;
            color: #333;
            margin-bottom: 20px;
            padding-bottom: 10px;
            border-bottom: 3px solid #667eea;
        }}

        .charts {{
            display: grid;
            grid-template-columns: repeat(auto-fit, minmax(400px, 1fr));
            gap: 30px;
            margin-bottom: 30px;
        }}

        .chart-container {{
            background: white;
            padding: 20px;
            border-radius: 8px;
            box-shadow: 0 2px 8px rgba(0,0,0,0.1);
            text-align: center;
        }}

        .chart-container img {{
            max-width: 100%;
            height: auto;
            border-radius: 4px;
        }}

        .info-grid {{
            display: grid;
            grid-template-columns: repeat(auto-fit, minmax(300px, 1fr));
            gap: 15px;
            margin-bottom: 30px;
        }}

        .info-item {{
            background: #f8f9fa;
            padding: 15px;
            border-radius: 6px;
            border-left: 4px solid #667eea;
        }}

        .info-item .label {{
            font-size: 14px;
            color: #666;
            margin-bottom: 5px;
        }}

        .info-item .value {{
            font-size: 16px;
            color: #333;
            font-weight: 500;
        }}

        .test-cases-table {{
            width: 100%;
            border-collapse: collapse;
            margin-top: 20px;
            background: white;
            box-shadow: 0 2px 8px rgba(0,0,0,0.1);
            border-radius: 8px;
            overflow: hidden;
        }}

        .test-cases-table thead {{
            background: linear-gradient(135deg, #667eea 0%, #764ba2 100%);
            color: white;
        }}

        .test-cases-table th {{
            padding: 15px;
            text-align: left;
            font-weight: 600;
        }}

        .test-cases-table td {{
            padding: 12px 15px;
            border-bottom: 1px solid #e9ecef;
        }}

        .test-cases-table tbody tr:hover {{
            background: #f8f9fa;
        }}

        .status-badge {{
            display: inline-block;
            padding: 4px 12px;
            border-radius: 20px;
            font-size: 12px;
            font-weight: 600;
            text-transform: uppercase;
        }}

        .status-passed {{
            background: #d4edda;
            color: #155724;
        }}

        .status-failed {{
            background: #f8d7da;
            color: #721c24;
        }}

        .status-skipped {{
            background: #fff3cd;
            color: #856404;
        }}

        .priority-high {{
            color: #dc3545;
            font-weight: 600;
        }}

        .priority-medium {{
            color: #ffc107;
            font-weight: 600;
        }}

        .priority-low {{
            color: #28a745;
            font-weight: 600;
        }}

        .error-message {{
            background: #f8d7da;
            color: #721c24;
            padding: 10px;
            border-radius: 4px;
            margin-top: 5px;
            font-size: 13px;
            border-left: 4px solid #dc3545;
        }}

        .screenshot {{
            max-width: 200px;
            max-height: 150px;
            cursor: pointer;
            border-radius: 4px;
            transition: transform 0.3s;
        }}

        .screenshot:hover {{
            transform: scale(1.05);
        }}

        .custom-image {{
            margin: 20px 0;
            text-align: center;
        }}

        .custom-image img {{
            max-width: 100%;
            height: auto;
            border-radius: 8px;
            box-shadow: 0 4px 12px rgba(0,0,0,0.1);
        }}

        .custom-image .image-title {{
            font-size: 18px;
            font-weight: 600;
            margin: 15px 0 10px 0;
            color: #333;
        }}

        .custom-image .image-description {{
            font-size: 14px;
            color: #666;
            margin-bottom: 15px;
        }}

        .footer {{
            background: #f8f9fa;
            padding: 20px;
            text-align: center;
            color: #666;
            font-size: 14px;
        }}

        @media print {{
            body {{
                background: white;
                padding: 0;
            }}
            .container {{
                box-shadow: none;
            }}
        }}
    </style>
</head>
<body>
    <div class="container">
        <!-- 报告头部 -->
        <div class="header">
            <h1>{report_title}</h1>
            <div class="subtitle">生成时间: {datetime.now().strftime('%Y-%m-%d %H:%M:%S')}</div>
        </div>

        <!-- 测试摘要 -->
        <div class="summary">
            <div class="summary-card total">
                <div class="label">总用例数</div>
                <div class="value">{summary.get('total', 0)}</div>
            </div>
            <div class="summary-card passed">
                <div class="label">通过</div>
                <div class="value">{summary.get('passed', 0)}</div>
            </div>
            <div class="summary-card failed">
                <div class="label">失败</div>
                <div class="value">{summary.get('failed', 0)}</div>
            </div>
            <div class="summary-card skipped">
                <div class="label">跳过</div>
                <div class="value">{summary.get('skipped', 0)}</div>
            </div>
            <div class="summary-card pass-rate">
                <div class="label">通过率</div>
                <div class="value">{summary.get('pass_rate', 0):.1f}%</div>
            </div>
        </div>

        <!-- 测试信息 -->
        <div class="section">
            <h2 class="section-title">测试信息</h2>
            <div class="info-grid">
                <div class="info-item">
                    <div class="label">开始时间</div>
                    <div class="value">{summary.get('start_time', 'N/A')}</div>
                </div>
                <div class="info-item">
                    <div class="label">结束时间</div>
                    <div class="value">{summary.get('end_time', 'N/A')}</div>
                </div>
                <div class="info-item">
                    <div class="label">执行时长</div>
                    <div class="value">{summary.get('duration', 'N/A')}</div>
                </div>
                <div class="info-item">
                    <div class="label">测试环境</div>
                    <div class="value">{summary.get('environment', 'N/A')}</div>
                </div>
                <div class="info-item">
                    <div class="label">测试人员</div>
                    <div class="value">{summary.get('tester', 'N/A')}</div>
                </div>
            </div>
        </div>

        <!-- 图表 -->
        {charts_html}

        <!-- 自定义图片 -->
        {custom_images_html}

        <!-- 测试用例详情 -->
        {test_cases_html}

        <!-- 页脚 -->
        <div class="footer">
            <p>© 本心保留权利</p>
            <p>本心智能测试</p>
        </div>
    </div>
</body>
</html>"""

        # 确保目录存在
        directory = os.path.dirname(file_path)
        if directory and not os.path.exists(directory):
            os.makedirs(directory, exist_ok=True)

        # 保存HTML文件
        with open(file_path, 'w', encoding='utf-8') as f:
            f.write(html_content)

        return {
            "success": True,
            "message": f"成功生成测试报告: {file_path}",
            "file_path": file_path
        }

    except PermissionError:
        return {
            "success": False,
            "message": f"没有权限写入文件: {file_path}",
            "file_path": file_path
        }
    except Exception as e:
        return {
            "success": False,
            "message": f"生成报告失败: {str(e)}",
            "file_path": file_path
        }
报告结构设计:
测试摘要:以卡片形式展示总用例数、通过数、失败数、跳过数和通过率测试信息:包含开始时间、结束时间、执行时长、测试环境和测试人员信息数据分析图表:
饼图:直观展示测试结果分布柱状图:比较各模块的测试情况
自定义图片:支持添加系统架构图、关键界面截图等测试用例详情:表格形式展示每个测试用例的详细信息
技术实现细节:
响应式设计:使用CSS Grid布局,确保在不同设备上都有良好的显示效果数据可视化:利用Matplotlib生成图表,并通过base64编码直接嵌入HTML交互体验优化:添加悬停效果、状态标签颜色区分、截图预览等功能图片资源处理:将本地图片转换为base64编码,保证报告的独立性
3. 图表生成与处理
系统实现了多个辅助函数来支持图表生成和处理:
_generate_charts_html
_fig_to_base64
_image_to_base64
def _fig_to_base64(fig) -> str:
    """将matplotlib图表转换为base64字符串"""
    buffer = io.BytesIO()
    fig.savefig(buffer, format='png', dpi=100, bbox_inches='tight')
    buffer.seek(0)
    image_base64 = base64.b64encode(buffer.read()).decode()
    buffer.close()
    return image_base64
三、技术栈与实现细节
1. 主要技术栈
LangChain:构建智能代理和工具集成openpyxl:Excel文件操作和格式化Matplotlib:数据可视化和图表生成Base64编码:图片资源嵌入HTMLCSS Grid/Flexbox:响应式布局设计
2. MCP工具集成
web_agent通过MultiServerMCPClient集成了多种外部服务:
def get_mcp_server_chart_tools():
    client = MultiServerMCPClient(
        {
            "mcp_chart_server": {
                "command": "npx",
                "args": ["-y", "@antv/mcp-server-chart"],
                "transport": "stdio",
            }
        }
    )
    tools = asyncio.run(client.get_tools())
    return tools
这种模块化的工具集成方式使得系统具有良好的扩展性,可以轻松添加新的功能模块。
四、实际应用场景
1. 测试用例管理
web_agent可以帮助测试团队快速生成和导出测试用例:
基于需求描述自动生成测试用例按照标准化格式导出到Excel并保存到本地支持不同类型的测试用例管理
2. 自动化测试报告
在自动化测试执行完成后,web_agent可以自动生成全面的测试报告:
汇总测试结果和关键指标生成直观的数据可视化图表提供详细的测试用例执行记录支持错误信息和截图展示
3. UI自动化测试
通过集成的浏览器自动化工具,web_agent可以执行UI测试并生成报告:
模拟用户操作进行界面测试捕获关键界面截图将测试结果整合到报告中
五、系统优势与价值
1. 提升测试效率
自动化生成:减少手动编写测试用例和报告的工作量标准化格式:确保测试文档的一致性和专业性快速迭代:支持敏捷开发中的快速测试需求
2. 增强可视化效果
直观的数据展示:通过图表直观展示测试结果专业的报告格式:精美的HTML报告提升可读性丰富的交互体验:响应式设计和交互效果提升用户体验
3. 提高测试质量
标准化流程:规范测试用例和报告的生成流程详细的结果记录:完整记录测试过程和结果错误追踪:便于问题定位和跟踪
六、总结与展望
web_agent智能测试助手展示了AI技术在测试自动化领域的应用潜力。通过集成LangChain框架和多种专用工具,它实现了测试用例生成和报告创建的自动化,为测试团队提供了强大的支持。
未来发展方向
AI驱动的测试用例生成:基于需求文档自动生成更智能的测试用例测试结果智能分析:使用机器学习分析测试结果,预测潜在问题与CI/CD集成:无缝集成到持续集成和持续部署流程中多平台支持:扩展支持更多类型的应用和测试场景
通过不断优化和扩展,智能测试助手将在软件开发质量保证过程中发挥越来越重要的作用,帮助团队在保证质量的同时提升开发效率。

© 版权声明
文章版权归作者所有,未经允许请勿转载。
相关文章


暂无评论...