网站搭建完成,突然发现注册页面还是WP原始的样子,由于我们用的是Astra主题,所以有Astra主题下的登录页面,还有弹窗登录,但是奇怪的是Astra主题没有注册模块的样式。
网上找了一圈,有的网页构建器可以有注册部件,直接新建一个页面就行了,超级爽的应用,但是我用的是Elementor,没有这个注册部件。此路不通。
再有就是插件,插件,有许多美化登录页面的插件,尝试用过,许多还是收费的,也麻烦。
Any way, 自己动手。
由于网站业务的关系,涉及的修改也比较多
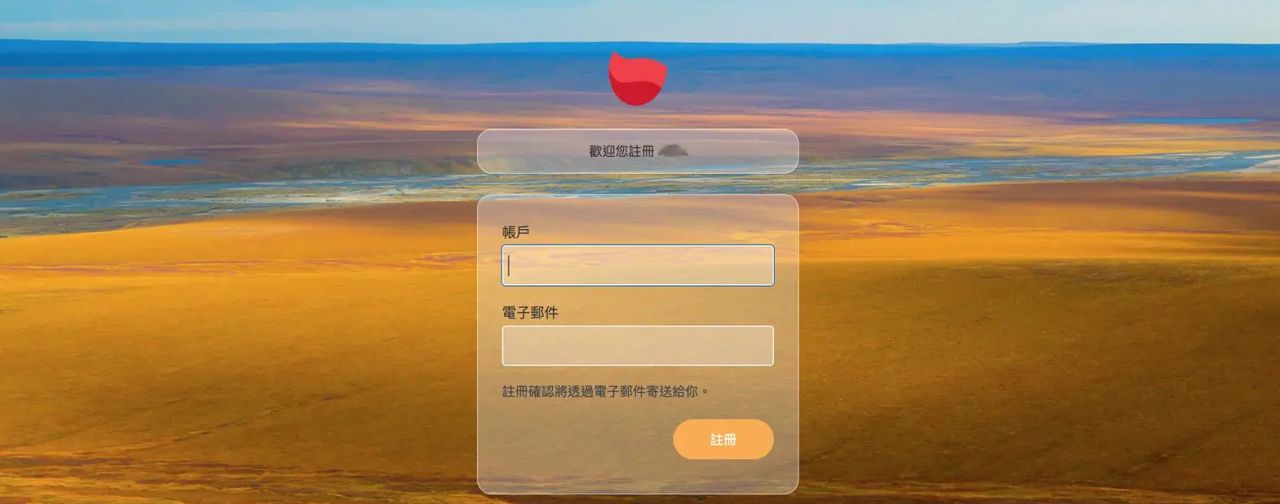
1.美化注册页面
2.多语言提示语
3.判断用户登录状态,跳转到用户中心
4.背景,bing图库,多图随机显示
当然,必不可少的是在functions.php放钩子
//自定义登录页面的logo链接为首页链接
add_filter( login_headerurl , create_function(false,"return get_bloginfo( url );"));
//更改logo的title为网站名称,默认是“Powered by WordPress”(基于WordPress)
add_filter( login_headertitle , create_function(false,"return get_bloginfo( name );"));
有的朋友可能有需要将logo链接和title改成单独自定义的,我这里就不写了,网上一大堆有用的代码可以去搜索。
仅仅只是修改了logo的链接和title,肯定是不行的,连logo图都没改呀,
怎么办呢?剩下的都在css里面实现。
//增加自定义样式表css
function custom_login_style() {
    echo  <link rel="stylesheet" type="text/css" href="  . get_stylesheet_directory_uri() .  /custom-login.css" /> ;
}
add_action( login_head ,  custom_login_style );
看到上面这段代码,根据路径,是子主题跟functions.php同一文件夹里面新建文件custom-login.css
get_stylesheet_directory_uri() 这是子主题的写法,
网上找到的都是应用原主题的写法 get_bloginfo( template_directory ),如果把这个用到子主题上的话,css的相对路径就错了,会链接到父主题的文件夹里面去。
您也可以放在子主题的其他文件夹,但是要修改这段代码里面的路径。
好,再来说custom-login.css
实则这个css,网上一大堆,但是各有千秋,不能随意乱用,我这里还做了一些动画特效,
下面这段是背景图片,当然您也可以在这里设置字体。
body{
width:100%;
height:100%;
background: url(images/pic.jpg) no-repeat;/*背景图片*/
    -moz-background-size: cover;
    -ms-background-size: cover;
    -webkit-background-size: cover;
    background-position: center center;
    background-repeat: no-repeat;
    background-size: cover;
}
再来修改logo,这里需要在主题 images文件夹添加logo图片,reg-logo.jpg
/*logo到顶部的间隔*/
#login {
    padding: 50px 0 0 !important;
}

/*顶部的logo*/
.login h1 a {
background:url(images/reg-logo.jpg) no-repeat;/*logo图片*/
width: 60px;
height: 60px;/*尺寸*/
padding: 0;
margin: 0 auto 1em;
border: none;
–webkit–animation: dropIn 1s linear;
animation: dropIn 1s linear;
}
把登录框设置成了半透明的毛玻璃样式,还有设置了圆角
/*登录框表单*/
.login form, .login .message {
background: #fff;
    background: rgba(255, 255, 255, 0.3);
border-radius: 15px;
border: 1px solid #fff;
    border: 1px solid rgba(255, 255, 255, 0.4);
–webkit–animation: fadeIn 1s linear;
animation: fadeIn 1s linear;
}
这里是输入框,键入输入框时超级讨厌的蓝色2px的边框,找了半天也只能改掉其中1px,也算是勉强可以吧。
输入框也搞了一个半透明效果。
/*登录框输入框*/
.login label {
color: #333333;
}
.login .message {
color: #333333; text-align: center;
}
.login .message a{
    color:#f9ad4a;}
.login .message a:hover {
    color:#1a1a1a;}/*提示语里面链接文字的颜色*/
#user_login{
font-size: 18px;
line-height: 32px;
}

.login form .input, .login form input[type=checkbox], .login input[type=text] {
    background: rgba(255, 255, 255, 0.3);
    border: 1px solid #fff;
}

/* 返回博客与忘记密码链接 */
#backtoblog a, #nav a {
color: #fff !important;
display: inline–block;
–webkit–animation: rtol 1s linear;
animation: rtol 1s linear;
}
这里是做的动画效果,
/*掉落的动画效果*/
@-webkit–keyframes dropIn {
0% {
–webkit–transform: translate3d(0, –100px, 0)
}
100% {
–webkit–transform: translate3d(0, 0, 0)
}
}
@keyframes dropIn {
0% {
transform: translate3d(0, –100px, 0)
}
100% {
transform: translate3d(0, 0, 0)
}
}
/*逐渐出现的动画效果*/
@-webkit–keyframes fadeIn {
from {
opacity: 0;
–webkit–transform: scale(.8) translateY(20px)
}
to {
opacity: 1;
–webkit–transform: scale(1) translateY(0)
}
}
@keyframes fadeIn {
from {
opacity: 0;
transform: scale(.8) translateY(20px)
}
to {
opacity: 1;
transform: scale(1) translateY(0)
}
}
/*从右往左的动画效果*/
@-webkit–keyframes rtol {
from {
–webkit–transform: translate(80px, 0)
}
to {
–webkit–transform: translate(0, 0)
}
}
@keyframes rtol {
from {
transform: translate(80px, 0)
}
to {
transform: translate(0, 0)
}
}
再就是那个讨厌的按钮,为了跟网站统一样式,给改掉了,您也可以改成您自己网站一样的样式,反正WP原始的样式丑爆了。
/*按钮样式*/

        .login #nav a, .login #backtoblog a {
            color: #333333 !important;
        }
        .login #nav a:hover, .login #backtoblog a:hover {
            color: #f9ad4a !important;
        }
        .login .button-primary {
            background: #f9ad4a;
            border-color: #f9ad4a !important;
        }
        .login .button-primary:hover {
            background: #1a1a1a;
            border-color: #1a1a1a !important;
        }

.wp-core-ui .button, .wp-core-ui .button-secondary {
    border-color: #f9ad4a !important;
    background: #f9ad4a;
    border-radius: 32px;
    width: 100px;
    height: 40px;
}
另外我还把Privacy Policy给隐藏了
/*隐藏Privacy Policy*/
.privacy-policy-page-link{display:none}
.privacy-policy-link{display:none}
就这样算了吗?
不可以的,wp-login.php是登录页面,wp-login.php?action=register是注册页面,
是在同一个网页上面的两个模块
但是注册模块的logo下面有一行讨厌的字
“Register For This Site”,简体字是 [在这个站点注册]
必须得改掉,(想不通Wordpress官方怎么还放着么傻X的文字在这里)
为了改这个,痛苦死我了。
改这段文字,网上搜到的解决方案基本不靠谱,
而且关于这个的解决方案很少。
在github找到一段,也有问题,只对网站默认语言有效,你要实施多语言是不可以,由于它这个对当前页面的一些判断无效,strpos($message, Register )
https://gist.github.com/hmbashar/8a43d42102381df1fec9840032755a3e
function change_reg_message($message)
{
    // change messages that contain  Register
    if (strpos($message,  Register ) !== FALSE) {
        $newMessage = "Hello! We re so excited to have you as a member! Just enter a username and your email, and we ll have you squared away in no time.";
        return  <p class="message register">  . $newMessage .  </p> ;
    }
    else {
        return $message;
    }
}
// add our new function to the login_message hook
add_action( login_message ,  change_reg_message );
在这段代码的基础上,我做了一些修改
主要是加上多语言,还有修改了对当前页面和语言的判断
这样完美解决在polylang插件应用下的多语言网站,修改注册页面的提示文字。
这里利用pll_current_language作为语言判断,通过识别当前网址wp-login.php?action=register里面是否含有action=register来判断是登录页面还是注册页面。
不能只去判断register,由于还有一个注册完成的提示页wp-login.php?checkemail=registered
//修改注册提示语’ Default “Register For This Site”
function change_reg_message($message)
{
          switch (pll_current_language())
          {
        case  zh : $newMessage = "歡迎您註冊 IBM";
             break;
    case  en : $newMessage = "Welcome to Register for IBM";
             break;
          }
    $web_url = $_SERVER["REQUEST_URI"];
//识别当前网址,并判断网址中是否包含action=register,识别当前是否注册页面。
       if (strpos($web_url,  action=register ) !== FALSE){
           return  <p class="message register">  . $newMessage .  </p> ;
            }
}
// 将新函数添加到 login_message 钩子中
add_action( login_message ,  change_reg_message );
WordPress还有一个很坑的地方,
就是当我觉得一切OK了,新注册一个用户提交,测试一下,发目前已登录状态下wp-login.php还能打开并且可以操作登录或者注册。
然后我又不得不再挂一个钩子,
这样当用户是已登录状态,进入wp-login.php,跳转到用户中心页面
//wp-login页面判断用户是否登录状态,然后跳转到用户中心页面
function custom_logged_in() {
if( is_user_logged_in() ) {header("Location: /my-account"); }  //header跳转
else {}
}
add_action( login_head ,  custom_logged_in );
后来又发现 Title里面网站名称后面有一个Wordpress,
<title>Log In ‹ 网站名称 — WordPress</title>
有两种方法,一种是删除,一种是修改,
由于我的网站是多语言,比较适合删除 — WordPress这种方法。省得修改之后又要分语言。
完美解决。
//删除 title里面的Wordpress
add_filter( login_title ,  remove_login_title , 10, 2);
function remove_login_title($login_title, $title){
    return $title.  ‹  .get_bloginfo( name );
}
背景,bing图库,多图随机显示
我看到网上许多人拿这个bing图库API卖钱,还只是单张图,想来想去,暂时还是不要公开这段代码了。
© 版权声明
文章版权归作者所有,未经允许请勿转载。
相关文章


暂无评论...